Categories
Studio Lights Education

Lighting details in ommercial Still Life Photography

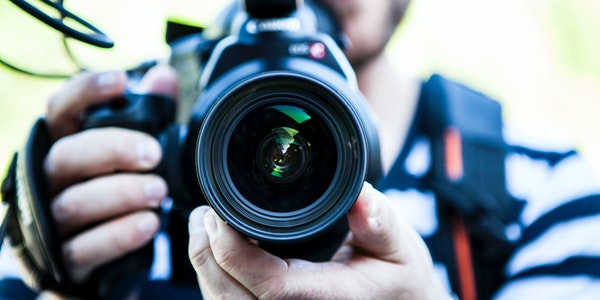
Learn What the Photo is for

Don’t be too greedy, you are not a master photographer, you don’t have a master camera. Your creativity is limited, you just need to take enough photos. Don’t expect to be able to take a photo with a digital camera that will work in any situation.

You must think carefully about the use of the photo in advance, and the entire shooting plan is based on immediate needs from the beginning. Temporarily thinking about this and thinking about that, the result is thankless.

Ordinary digital cameras do not have high pixels, and the composition should be as close as possible to the desired composition of the finished product to avoid large cuts.

Sketch is Most Important

Even if you’re taking a simple photo of a product, unless it’s a snapshot without any background, it’s best to start with a sketch. For example, the layout of the layout, the angle of the photo, just sketch the picture roughly. In this way, you don’t need to think about it when shooting, and it is convenient to have a basis for shooting. More importantly, with prior planning, you know the photo requirements.

Is the product in your photo to be a code without any background? For backgrounds, which backgrounds should I use? How many spaces are reserved for text, and what are the needs of other props.
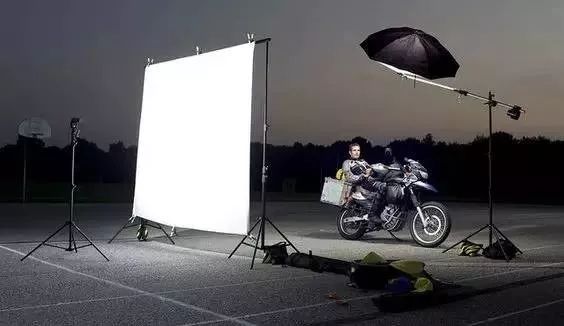
Light

Lighting is definitely a very advanced knowledge in commercial photography.

Available lights: light tube light source (set the white balance carefully), desk lamp (if the light is uneven, you can use butter paper to disperse the color), quartz lamp (low color temperature, 3200-3600K, inclined to yellow, and will release high heat energy, consumption The power is high, be careful when using it too hot), sun light (a kind of light that releases the temperature of 5300-5600K in the sun, close to the light, no need to adjust the white balance when shooting) and studio flash.

Light Stand

Each light stand has its own loadable weight. Be sure to check the load before use to ensure that the flash can be firmly grounded.


Background

Background paper, cloth (for shooting noble objects, silk, silk and flannel can be used as the background with a softer texture), acrylic sheet (reflective sheet, which can create a colored reflective mirror effect), fireproof board, brick Board, wallpaper, metal plate, tape (with a very high gloss, the highlight level is usually exposed and transitioned, and the background that appears in the shot will look wet and watery, which is very special), blinds and corrugated plastic board, on-site shooting.

​​

Reflector

Reflectors are useful for commercial photography, especially when shooting objects with multiple reflective surfaces, so that the reflective surfaces don’t appear shadowed or darkened.

Materials that can be used as reflectors: foam board (half an inch thick, pay attention to the use of high-heat lights to easily dissolve and release harmful substances), high-density foam board and glue corrugated.

Softbox

The lighting effect of the softbox makes the reflective objects have very uniform and broad lighting, and the secret is to use diffuse lighting. Use a translucent frosted film as a soft surface, and put the light behind to make it softer when the light penetrates. Softboxes can spread the light more evenly, so that the light can be distributed more widely. The larger the softbox, the more obvious the effect.

Reflect/Shadow/Soft Light Tool

Aluminum paper: can be used as a hard light.

White reflector: for general reflection.

Black cardboard: used for shading or placed in front of the mirror to prevent light from entering.

Butter paper: used to soften the light.

Film pad for copying: It can soften the light and is more durable.

Folding reflector: more convenient but not necessarily suitable for shooting small pieces.

Mirror surface: The reflection is relatively strong, but it is very concentrated, and it will not have a large area of scattering like white cardboard, so the effect is different from that of cardboard. Therefore, photographers adopt different material reflections according to different needs.

​​

Consumables

Glycerin: Add three parts water to make the sprayed water droplets look firmer.

White gasoline: clean the stains and stickers on the surface of the object

Kerosene: Cleans oil stains on metal surfaces

Varnish: or matte spray to reduce the reflectiveness of reflective objects

Glass water: clean glass

Camera Settings

pixel

photo format

white balance

Color saturation: Enhancing the color saturation during shooting will reduce the level of the color position, make the product lose its proper texture and detail, and lead to an increase in blur. Shoot with normal or even -1 level color saturation to reduce image blur and make images with better gradation.

clarity

ISO sensitivity.

Bracketing

connection of flash

Illumination

Light source color temperature and white balance

Different light sources will have different color light and color temperature. Professional flashlights provide a standard daylight color temperature of about 5500K-6000K. In this color temperature, because the ratio of red, green and blue is relatively even, the white objects in the image can be reproduced as white.

A common household light bulb is 2800K, which emits a very red light. As for household light pipes, which are also commonly used light sources, they have serious and different color cast problems. As for sunlight, the color temperature also changes in the morning and evening.​​

Whether with flash, daylight, light pipes or bulbs, manual white balance calibration is available, with flash lighting for best results. When using daylight, light pipes or light bulbs, you must manually calibrate the white balance.

Hard light & Soft Light

In addition to reflection and scattering of soft light, the relationship between the light source and the subject also affects the hardness of the light. The closer the light source is to the subject, the larger its area is, making the shadow softer. If the light source is far away and the light source is relatively weak, the shadow will become hard.

No matter how many lights you use, there should only be one main light, with only one more visible shadow. If you use it without restraint, the picture will be cluttered. With studio flash, you can use a diffuser screen for soft light and direct light for hard light.

For the average person, the angle of the lighting of the light may not be too concerned. For photographers, it is very important to use different lighting to take beautiful photos. But for commercial photography, the use of different angles of light can describe the shape, texture and overall atmosphere of the photo.

The lighting in the studio is actually simulating natural lighting. The key light will come from directly in front of the subject, so unless you want to shoot particularly dramatic effects, the usual key light will be lit from top to bottom, ranging from 30 degrees to 60 degrees to the camera. In addition, one or two lamps can be used as weak fill light in order to reduce the reflection to a reasonable level.

Flexible Lighting Angle

The main purpose of lighting is to use light to bring out the characteristics of the subject, or to create an atmosphere, regardless of which lighting angle is used.

You can place the subject and props to be photographed separately on the shooting platform, and then use a tripod to fix the DC, and do the required composition. Then re-adjust the position of the main body seen on the screen, and then put the accessories and props, and then start adding lights. You need to arrange the main light first, after roughly reaching your lighting effect, then add the auxiliary light and reflector for fill light.

Large area soft lighting: mainly used for goods that need to be seen clearly. Usually do top light processing, with a 45-degree camera angle, such as food, general merchandise.

Texture light: The purpose is to bring out the texture of the subject, such as using positive side light, positive top light, or narrow-angle backlight to bring out the texture from the back.

Backlighting: For shooting glass and other light-transmitting works.

Back top light: Arrange the light to the top and back of the subject and illuminate it from the back, and add a shading plate to make the light fall on the top and back of the subject subtly, highlighting the top edge of the subject.

Experience

For some appreciative collections, it is best to use side lighting, which has a better texture. Add white cardboard reflection in the dark part or backlight. Butter paper softens the light and avoids hard shadows. Use butter paper for soft light, not necessarily a large area, sometimes a small piece of butter paper placed in front of the lamp, or even just cover the lamp.

Generally, when shooting a watch or clock, it will be calibrated at 10:10 or 2:50.

Usually, the product photos that imitate the home environment will have a window light behind it to simulate the sunlight entering the house from the window, and the light level will usually explode.

Commercial photography is the most difficult to shoot with highly reflective metal or glass objects, so you must know how to accommodate and make good use of lighting when shooting.

Blue can bring out the coolness of metal and glass/crystal.

Difficulties in shooting metal knives and forks: The metal has a large reflective surface and a curved surface. Therefore, there should be a very large area of ​​the light source close to the light source. So that the metal surface of the knife and fork is completely reflective, and the edges show subtle light and dark textures. For the background, use a black acrylic sheet to create a mirror effect of reflection, and pay attention to accurate exposure.

If you don’t have a large softbox, you can use a large piece of butter paper instead. Carefully adjust the angle of the butter paper or softbox to get the gradient light behind. Be careful to cover all reflective surfaces with the light position. Be sure to turn off all excess lights when shooting.

Categories
Studio Lights Education

Four Ways to Focus Successfully When Shooting at Night

If you shoot night scenes, you may have encountered the problem of not releasing the shutter when you press the shutter. One of the reasons is because the camera fails to focus, and the shooting function is automatically locked, so that the camera cannot complete the shooting. So, what is the solution to this situation? Let’s take a look!

Look for Glowing Objects to Autofocus

Focusing is possible as long as there is light. Although sometimes luminous objects (such as street lights, moon, etc.) do not fall exactly on the focus point, at this time we can adjust the camera’s focus point to focus on the luminous object. But be sure to note that the illuminated object needs to be at the same distance from the subject that you want to focus on. For example, you originally wanted to focus on the top of the mountain (infinity), but it was too dark to focus. At this time, you can focus on the sky with the moon (luminous object), and the result is infinite, and you can shoot successfully at this time!

Assists Autofocus with External Light Sources

Sometimes if the subject to focus on is the foreground, such as a valley at night, the autofocus fails because there is not enough light in the scene. At this time, we can keep the autofocus first, and then turn on the flashlight to illuminate the subject. Half-press the shutter, after the focus is successful, then set the camera to manual focus. After focusing, you can concentrate on framing the shot and setting the aperture shutter. But be careful when using this method, after setting the manual focus, do not move the position of the camera and avoid moving to the focusing ruler on the lens (if there is one), otherwise you will have to refocus.

Just Switch to Manual Focus

The easiest way (but more difficult for beginners) is to use manual focus entirely. It is convenient for cameras that have an electronic viewfinder (EVF) or that can use live view. Some can even zoom in on the scene to focus, increasing the chance of success.

Use Preset Focus Points

This method is especially useful for shooting “infinity” scenes, such as taking pictures of stars. The principle is to do the steps mentioned in the second point in advance, but it can be done when there is sufficient light. Focus the lens at infinity, and then mark the “focus at infinity” position on the lens (you can use a sticker), and when you use it, you can directly adjust to manual focus and adjust the focus ring to the mark, which is very convenient and fast.

M Mode Shooting in Manual Mode

1. The difference between M gear and other gears

M refers to full manual mode. M-speed shooting can manually control aperture, shutter speed, ISO, exposure compensation, focal length, etc., according to the scene and shooting needs, so as to control the brightness of the photo.

AV: Aperture priority. Manually set the current aperture size and the camera calculates for you how much shutter speed and ISO you need. In most cases, AV files can meet most of your requirements – even sports and scenery themes.

TV: Shutter priority. Manually set your current shutter speed, and the camera figures out what aperture and ISO you need. Typically used when photographing fast-moving targets.

B: Equivalent to M gear. It is turned on when the exposure time needs to exceed 30 seconds, and it generally needs to be used with the shutter release.

2. The relationship between M file and the three elements of exposure

There are three elements of exposure: aperture, shutter, and ISO.

The M file is a shooting mode that manually adjusts the three-element parameters, so it is called the manual mode. That’s why the M file looks complicated. But as long as we understand the three elements, we can easily use it.

3. Advantages of M gear

(1) Let you think about the composition and theme of the picture

Using the full manual mode, you can decide to use the aperture to adjust the shutter first according to the different shooting subjects. Such a decision-making process will train your observation and creativity, and make your work more diverse. At the same time, it will also improve the ability of independent creation.

(2) The exposure value is fixed

In full manual mode, the set aperture, shutter, and ISO value will not change with the composition and framing. That is to say, other shooting modes require exposure lock after metering before secondary composition shooting can be performed. Therefore, the full manual mode can make the photographer more directly grasp the light and shadow.

4. M file shooting application

When shooting sunrise and sunset, light painting, milky way, aurora, slow door and other landscape creations, you need to adjust the photo brightness independently. Using the M file is the best choice for shooting, to ensure accurate exposure. Learned that you can also shoot the Milky Way star blockbuster.

M file to shoot the Milky Way

When shooting with professional flash in the studio, or in complex light and strong backlight situations, it is difficult to get the correct exposure in the ordinary automatic mode. We have to shoot in M ​​mode and make precise adjustments to the parameters.

Categories
Studio Lights Education

Four Essentials of Stage Photography

Brief Introduction

Stage photography has long been familiar to people. On the surface, compared with other photography categories (such as portrait photography, landscape photography, etc.), the basic shooting requirements and artistic processing methods of stage photography seem to be no different, but they are not the same after careful analysis. The main difference is that shooting a stage photo often requires feeling and experience to compose the shot in a very short time, and press the shutter quickly. This requires the photographer to have excellent shooting technology and artistic processing skills.

However, there are also rules to follow in the creation of stage photography. Especially in terms of technology, some methods can be the essentials, so that beginners can avoid detours. Taken together, there are four aspects.

1. Selection of Shooting Position and Angle of View

To take a stage photo in a theater or square, you must first choose the shooting position and perspective. Generally speaking, looking for a slightly off-center position will produce good results and will not hinder the audience.

The angle of view is also important. If the viewing angle is too high, the characters will be distorted. The angle of view is too low to see the feet of the characters (partial or close-up shots are another matter), it is better to be able to see the stage surface.

Beginners often like to shoot in the middle of the theater, thinking that they can capture the front of the characters and the complete stage scene. As a result, the body shape of the photographed characters is rigid, the lighting shape is dull, and the picture effect will be mediocre. This is because, usually, the layout of stage lighting is that the frontal light is stronger, and this frontal light will weaken the sketch relationship of the characters. The sense of space and layering of the character modeling will be diluted, and the light and shadow effects will also be dull.

And choose a slightly biased angle to shoot, the characters have a combination of front light, side light and backlight, plus the abundance of various color light sources, the layering and light and shadow effects of the picture will naturally be reflected, especially the flow of space. will strengthen.

2. Try to Stabilize the Camera as Much as Possible

To take good stage photos, camera stability is very important. Usually, when taking stage photos, the shutter speed is often controlled at about 1/60 of a second. This is to make the photos taken have both a clear subject image and a sense of flow.

To achieve these goals, the shutter speed of l/60 seconds (especially below 1/60 seconds), the stability of the camera obviously cannot be ignored. Another factor is that in order to achieve the effect of changing the real and virtual images, the aperture should be enlarged as much as possible. Doing so will shorten the depth of field, and if the camera shakes a little, the clarity of the picture will suffer. Therefore, it is very important to increase the stability of the camera with the help of a tripod or monopod.

3. Do Not Use Flash for Exposure

Stage photography has gradually developed from a simple recording type in the past to a creative type. This change is also the process of stage photography turning from practicality to artistry.

Shooting with flash is nothing more than wanting to make the picture clearer. The consequence of this is that the light of the flash dilutes the unique lighting and color effects of the stage, or even completely loses the stage effect. And these effects are precisely the essence of stage photos.

Therefore, strictly speaking, it is not appropriate to use flash when shooting stage photos. Of course, sometimes because the light on the stage is too low, or just to take a still photo. You can also use the flash, but the photo will definitely lose the stage effect.

4. Setting the Right Aperture is Important

Aperture setting

Aperture, as a means of controlling depth of field, is also quite learned in stage photography. If used properly, the photos will have better results.

In live shooting, there is a certain distance between the camera and the stage, plus the stage itself has a depth, the sum of the two is generally more than 10 meters. If you don’t use a large aperture, the pictures taken will be unobstructed before and after, lacking a sense of primary and secondary, let alone changes in reality.

Especially in non-theater (such as stadiums, squares, etc.) to take stage photos, most of the background (sky curtain) is relatively simple. If we take the background clearly into the picture, it will inevitably affect the overall effect of the photo.

By using the method of magnifying the aperture to control the depth of field, the background can be blurred. The blurred background highlights the subject in front, and the blurred effect of the blurred background has a more formal aesthetic.

Aperture and Shutter Speed

Proper use of the aperture is important even when shooting stage photos in a formal theater. Because the shutter speed is controlled at about 1/60 of a second, the aperture should be adjusted with the intensity of the stage light. This adjustment should not only adapt to the shutter speed determined by the speed of the characters on the stage, but also take into account the different depth-of-field effects caused by the size of the aperture.

Setting the aperture too wide may underexpose. If the aperture is too small, the effective range of depth of field will be too long, and the background will not be blurred. It is a consensus that you need to open a wide aperture when taking stage photos. But in the end how much aperture is appropriate, should be based on the actual shooting needs. According to what kind of picture effect the photographer needs to achieve, it determines how large we should open the aperture , and the corresponding shutter speed is set. The size of the aperture will directly affect the effect of the picture.

Categories
Studio Lights Education

Stage Photography

1. Prepare Equipment and Ensure Clarity

It is best to prepare two SLR cameras, an 8- to 16-megapixel digital body and a film body. One body is equipped with a 28-135mm lens, and the other is equipped with a 70-200mm lens, so it is more convenient to capture. If you use black and white film, you can choose ISO400 and 800 professional high-speed film. Try to use a wide aperture when shooting, this will increase the shutter speed and avoid blur.

2. Observe with Two Eyes

To capture the best moments, see the models’ personalities by observing them in different styles of clothing. Selectively capture valuable moments, so that readers can see the unique artistic wisdom and keen observation and judgment ability of the photographer when appreciating the pictures.

Since shooting fashion shows and model competitions is a photography category between photojournalism and art photography, the photographer must have both good artistic accomplishment and a keen sense of news. Only by diligent observation, diligent shooting, and diligent thinking during shooting can we produce outstanding works that are different from others.

Conditional photographers can use two perspectives to watch from the whole process of tracking the model to shoot the location, to the preview or the preliminaries.

(1) Use the judge’s vision: through the on-site viewing, you can understand which models have the best temperament, and they may become the champion of this competition, and clarify the focus of this shooting.

(2) Use the photographer’s eyes: by watching and filming previews and preliminaries, familiarize yourself with the procedures of the entire performance or competition. Get to know the showmanship and temperament of all models and know which moments are newsworthy and artistic. Familiarize yourself with specific clothing styles and determine the best camera angles. In this way, you can have a good idea of ​​the key models, key moments, key scenes, key lighting effects, and key shapes during the official capture.

3. The Essentials of Capturing

Observation and refinement

Whether it is a fashion show or a model competition, it is necessary to observe, understand and refine on the spot.

On-site observation is to carefully observe each model’s posture, clothing, and shape, and tap its rich facial expressions and varied body language. Observing the density and density of the model when walking on the stage and the relationship between the dress and the background, capturing the dynamic of the model’s dress in the movement, etc.

When taking pictures, the camera is held in hand to track and focus on the model in motion, to capture the beautiful posture and shape of the model in the display. Don’t put down the camera to watch. If there is a beautiful moment at this time, you will be caught off guard and lose the opportunity.

On-site understanding and on-site refinement are to understand the body shape as points, lines and planes in geometry in the wonderful interpretation of the model, and to freeze the model’s body shape, curve, personality and fashion factors of clothing in an instant and become a work through judgment. .

Exposure and metering modes

Due to the needs of the display, with the rhythm of the music and the artistic effect of the stage design, the illumination of the lights is changeable. In order to ensure accurate exposure, you can set the camera to aperture priority in advance. And set the aperture to the maximum value.

During shooting, the shutter of the camera will be automatically adjusted with the intensity of the lighting. So that the captured images are clear. If the light is dim and the shutter speed is too slow, increase the camera’s sensitivity to ISO400 or 800. And if necessary, ISO1600.

However, the images shot at ISO1600 generally have very coarse grains. And the saturation and transparency of the colors decrease to a certain extent.

Generally, the color of the light source on the T stage is yellowish. Adjusting the color temperature of the camera to about 3200K before shooting will reduce the yellow component in the photo.

The metering mode depends on the subject of the shot, and center-weighted or average metering can be used. For large or medium shots, you can set the average metering. For close-ups, the metering mode should be set to center-weighted.

4. Pick up Tidbits

Don’t leave the scene immediately after shooting a wonderful modeling competition. As the saying goes: “The good show is later.” From my personal experience, the wonderful tidbits often appear after the game.

After a cruel competition of “one in a thousand miles”, after all, there is only one safflower. When they were about to separate, some hugged and congratulated each other because they won the award. And some went to the side to cry secretly because they were eliminated. These touching tidbits and moments of true emotion are a good time to shoot a masterpiece.

Categories
Studio Lights Education

11 Photography Composition Tips

1, “#” Character Lattice Composition Method

The “#” character lattice composition, that is, the picture is divided into three equal parts in the horizontal and vertical directions, and the scene is arranged on the third line or the point where the third line intersects when composing the picture.

In fact, this composition is one of the variations of the golden section composition. The advantage is that the picture has a tendency to lean on the angle, and it is easy to look forward to and take care of each part, so as to obtain a better visual effect.

2. Rule of Thirds

The composition method of placing the subject at the horizontal or vertical third line of the screen is called the rule of thirds composition. This composition can represent large spaces and small objects. The picture shot using the rule of thirds composition, the main body is prominent, the composition elements are concise, and the visual sense is strong.

3. Horizontal Line Composition

Horizontal line composition is also known as “horizontal composition”, that is, a composition technique that makes the main scene in the picture appear as one or more horizontal lines in the photo frame through the composition technique. It is one of the most used composition methods. The horizontal line composition can often create a peaceful and calm picture mood, and at the same time, the horizontal line in the picture can add a horizontally extending sense of form to the picture. The horizontal line composition can be divided into low horizontal line composition, medium horizontal line composition and high level line composition according to the position of the horizontal line.

a) Low horizontal line composition

Low horizontal line composition refers to the position of the main horizontal line in the lower 1/4 or 1/5 of the picture in the picture.

This horizontal line composition is used to focus on the main body above the horizontal plane. Of course, the part above the horizontal line of such an area must also have a scene worthy of emphasis in the picture. For example, beautiful clouds in a large area of the sky, the rising sun, etc.

b) Medium horizontal line composition

Mid-horizontal line composition means that the horizontal line in the picture is centered, and the upper and lower sides are equally divided into the picture.

This form of composition is usually used to capture a picture that is symmetrical up and down. This kind of object may be that the subject itself has a symmetrical structure up and down, but more often it is because the water surface below the picture can completely reflect the scene above the water surface, so that the picture has a sense of balance and equivalence. It is worth noting that the composition of the horizontal line is not a symmetrical composition, and the upper and lower scenes do not need to be consistent.

c) High level line composition

The high-level line composition refers to the position of the main horizontal line in the picture in the upper 1/4 or 1/5 of the picture.

The high-level line composition is just the opposite of the low-level line composition, and the focus is mainly on the parts below the horizontal line, such as large areas of water and ground. The use of this form of composition is usually due to the wonderful reflections or rich textures and pattern details on the water surface and the ground in the picture.

4. Vertical Line Composition

Similar to horizontal line composition, vertical line composition can create a sense of visual extension in the upper and lower directions of the picture. It can strengthen the strength and sense of form of vertical lines in the picture, giving people a tall and majestic visual experience.

When composing a picture, the photographer can also simply intercept the part of the subject to obtain a concise picture effect, so that the picture presents a strong sense of formal beauty.

The vertical line composition is used to express the forest, and its vigorous vitality is well expressed, and the picture has a strong sense of beauty.


5. Oblique Line Composition

The slanted line composition can make the picture dynamic, and produce visual extension along the direction of the two ends of the slanted line, which enhances the depth of the picture. In addition, the oblique line composition breaks the balanced form parallel to the frame of the picture, creating a potential difference with it, so that the oblique line part is highlighted and emphasized in the picture.

When shooting, the photographer can deliberately treat the objects that need to be visually extended or emphasized as diagonal elements in the picture according to the actual situation.

The slanted line composition expresses a sense of movement, and the picture does not look rigid.

6. Curve Composition

Curves have a beautiful and varied visual character. Curved composition can increase the rhythm of the picture and give people a soft visual experience. When photographing women, photographers also often use S-curve compositions to accentuate the female lines.

7. Symmetrical Composition

Symmetrical composition usually means that there are the same or visually equal subjects on both sides of the central axis of the picture, so that the picture is relatively balanced visually, thus producing a solemn and stable sense of coordination, order and stability. There are many subjects that are suitable for this form of composition, for example, symmetrical buildings, plants, etc.

In landscape photography, if you are shooting a water scene, incorporate the reflection of the water surface into the picture. Taking the boundary line with the water surface as the central axis of the picture for symmetrical framing to obtain a symmetrical composition with a strong sense of balance can be said to be a typical application of symmetrical composition.

8. Frame Composition

Frame composition is to use the subject itself or the environment around the subject to create a frame-shaped composition style in the picture. This is beneficial to “frame” the viewer’s point of view on the subject. So that it can get the viewer’s special attention.

In specific shooting, the choice of “frame” mainly depends on whether it can “frame” the viewer’s point of view on the subject, and it does not necessarily have to be a closed frame. In addition to the use of frame-shaped structures such as doors and windows, open and irregular “frames” such as branches and shadows are often used in framed compositions.

9. Scattered Composition

Scatter-point composition refers to the form of composition in which point-shaped subjects are concentrated in the picture, also known as “the goddess scattered flower composition”. Flocks of birds flying in the sky, flowers scattered all over the place, etc. can be the subjects of this composition.

When shooting, pay attention to the various combinations of “points” in the management picture, such as the relationship between virtual and real, density and density.

The flowers are expressed in a scatter-like composition, which looks natural and casual.


10. Perspective Traction Line Composition

Perspective drawing line composition can effectively draw the viewer’s sight and attention to a certain point or line in the whole picture to form a visual center. It not only has a guiding effect on the line of sight, but also greatly enhances the visual extensibility of the picture and increases the sense of space of the picture.

The greater the angle of the intersecting perspective lines in the picture, the more significant the visual space effect of the picture is. Therefore, the lens, shooting angle, etc. selected by the photographer when shooting will have a corresponding impact on the perspective effect of the screen. For example, the wider the angle of view of the lens, the more the foreground can be incorporated into the picture as much as possible. Thereby increasing the difference between the closest and the farthest part of the picture. And obtaining greater spatial depth of the picture.

11, Trompe l’oeil Composition

The trompe l’oeil composition means that by skillfully setting the shooting point, the scene in the foreground and the scene in the background are synthesized in a plane after shooting. And a novel or humorous image effect is obtained.

Composition is to organize the image to be expressed properly to form a coordinated and complete picture. But in the process of taking pictures, people’s thoughts are always the most critical element. No matter exposure, light, composition or other shooting methods, they are nothing more than expressing their thoughts through photos.

Therefore, it is very important to structure the picture before shooting. Of course, many landscape photos are uncontrollable when shooting, and more of them need to be played on the spot.

Categories
Studio Lights Education

What Do Focus Lock and Exposure Lock Do

How to Lock AE and AF

AE-L (Auto Exposure Lock) is one of the very important features in all kinds of SLR cameras. Here’s how to set it up.

Lock AE only:

The exposure is only locked when you hold down the AE-L/AF-L button. Conversely, when the button is released, the SLR camera will continue to automatically meter the light. However, because individuals are sometimes nervous during shooting, it is easy to hold down the AE-L/AF-L button, so some photographers almost never set “Lock AE only”.

To lock autofocus only:

Focus is locked when you hold down the AE-L/AF-L button. Conversely, when the button is released, the camera continues to autofocus. This feature is still very useful, especially when the light is relatively dim. When you are in focus, press and hold it to recompose the image, without worrying about the laborious adjustment to find the focus point. If the lens has a function to lock the focus, it will be much more convenient, just press it directly on the lens.

AE Lock (Hold): When you press the AE-L/AF-L button, the exposure and focus are locked (the lock is still in effect after you release the button), and it remains after you press the shutter. This setting is suitable for continuous shooting after exposure lock. This is generally used when shooting continuous scenes, such as large-scale sports meetings, football games, etc.

Why Use Focus Lock

The abbreviation of focus lock is AF-L, the full name is Automatic Focus Lock, which is represented by AF-L on SLR cameras. Autofocus is the same as autoexposure, and the normal setting is done when the shutter is half-pressed. However, AF needs to have a good reference object for focal coincidence comparison, otherwise, it will cause slow AF or AF failure. For example, when you are shooting moving objects (birds flying), due to the uncertain running trajectory and slow focusing, the image is blurred. At this time, you can wait for the focus, or you can focus lock to take slow photos.

If autofocus cannot be achieved when shooting, you can prioritize focusing on an object at the same distance. Then press the focus lock button to lock the focus value. Then point the lens at the object you want to shoot, meter the light according to the picture. And then complete a series of shots.

Why Use Exposure Lock

The abbreviation of exposure lock is AE-L, the full name is Automatic Exposure Lock. And it is generally represented by AE-L on SLR cameras. Generally, the automatic mode of our SLR camera, the exposure mode adopts the average metering mode. This basically meets our requirements when shooting general scenes. However, in scenes with complex lighting conditions, the captured images will have inaccurate exposures.

The most obvious example is shooting portraits against the light. At this time, if we choose the automatic exposure mode to shoot, you will find that the main body of the portrait is underexposed in the later photos. If we choose to approach the model’s face, let the face fill the entire metering area. First perform subject metering on the face, and then press the AE-L button on the body. Lock the exposure value, then return to a suitable position to recompose the shot and shoot. At this time, you will find that no matter where the subject of the portrait is in the frame, the exposure is always excellent.

Categories
Studio Lights Education

A few Practical Ways to Take Good Photos

Brief Introduction

If you want to take good photography, in addition to the camera parameter settings, you also need to pay attention to photography skills. Of course, aesthetic requirements are also indispensable. And to decide whether a photo looks good or not, the composition is the key. If there is a problem with the composition, no matter how good the scene is, it will not be noticed by the audience. So, today I’m going to talk to you about how to improve your composition.

1. Simplify the Scene

I believe that you often see some poorly shot photography works. In addition to the subject, the picture is also mixed with various interfering elements, so that the audience’s eyes cannot focus on one point, and the subject cannot be found at all. When I was studying photography, my teacher once said, “If you see a photo and you can’t see what its subject is at first glance, that photo is a failed work”. Photography is the art of subtraction, and the key point is how to choose the various elements in the picture.

2. Horizontal and Vertical Composition Shooting

Although we are accustomed to shooting horizontally when shooting, if we shoot the same subject or scene, it will be boring and boring. In many cases, it is not necessary to have a horizontal composition to shoot a good work. If the subject is suitable, we can also shoot the vertical composition of the picture. If you want to express the towering, upright and toughness of the mountain, shooting vertical composition works is a very good choice. Of course, the same portrait photography will also use vertical composition more often.

3. Try Not to Put the Main Body in the Middle

When taking some still life photos, we will find that the subject is in the center of the frame. But not all scenery or characters are suitable to be placed in the center of the picture. The still life or the product photography of some outlets is placed in the center, so that the viewer can discover the subject at the first time, highlight and show the subject.

But portraits and landscapes are not suitable for such shooting. If we use the center composition, we will find that the subject in the picture is clearly displayed in front of us at a glance, and it will be dull after reading it. Usually, we will arrange the main body of the picture on the left or right, and then slowly present the main body of the picture through visual guidance to make the photo more interesting and interesting.

4. The Guiding Factors in the Screen

If you are accustomed to expressing the subject in the picture very intuitively, although it cannot be said that your work is not good, but without the guidance of other elements of the picture, your photos will lack the desire for people to explore.

The guiding element in the picture is that the audience can follow your thoughts, just like guiding the prey to your trap, moving their eyes to the place you want to express. The guiding factor in the picture can be a point, a line, or even a small picture. Photos with introductory elements are more exciting.

5. The Tilt of the Screen Can Bring Special Effects

The tilt of the picture can bring some different feelings and enhance the stimulation of visual senses. Compared with the unstable and dynamic visual stimulation mentioned in the photography book, my explanation is more inclined to bring visual impact to the picture.

People will have a sense of security in the horizontal picture, but when they are stimulated by the senses that tend to the picture, they will have a feeling of heart palpitations. Just like when we are on TV or watching videos of bungee jumping, we will feel very exciting and a little nervous. When we are shooting, we can properly shoot some oblique pictures. Sometimes there are different effects!

6. Appropriate White Space in the Screen

This composition method is determined based on the inertia of human thinking. When we see something, we subconsciously associate it. The blank space is to use our thinking mode to leave a blank place in the picture to let the audience have reverie.

For example, when we photograph a moving car, we will think of whether there is a car in front of the moving car, and what the road conditions of the next section of the road will be. In the actual shooting, we leave a certain blank in the direction of the subject or the direction of sight, giving readers more room for imagination.

7. Blur the Background and Highlight the Subject

The depth of field effect is one of our common and commonly used techniques. Reduce visual interference in the picture and highlight the main body of the picture. Depth of field can often be seen in portrait photography. Of course, it’s not just for portrait photography. Sometimes taking landscape photos with depth of field can also play a very good effect.

8. Use Color Contrast

Contrast is one of the easiest, yet most difficult, techniques to master in photographic composition. The color theory we know requires a period of precipitation learning and time mastering to control the color ratio in the picture. Of course, color is also an indispensable element to render and set off the atmosphere of a photo. Making good use of the color contrast in the picture can quickly improve your photography skills.


Categories
Studio Lights Education

Digital Panorama Shooting Skills

1. Brief Introduction

Before the advent of digital imaging technology, there were two ways for people to take panoramic photos: to rotate and shoot with a dedicated panoramic camera, or to stitch them manually by a professional darkroom engineer. Either way, it is difficult for ordinary photographers to do it. The “panorama” boasted by the APS camera only utilizes the large angle of view of the ultra-wide-angle lens, and strictly speaking, it is more appropriate to call it a “block-frame photo”.

The popularity of digital cameras and digital image processing technology has made panoramic photography easier. Anyone with a digital camera and a computer that can run image processing software can try to create panoramic photos with amazing perspectives.

2. Types of Panoramic Photos

Panorama Pictures in a broad sense refers to all photos with a large viewing angle. In traditional photography, pictures taken with an ultra-wide-angle fisheye lens are also called panoramas. But that kind of photo has a strong perspective effect, and the image is completely distorted.

The panoramic photos we discuss here refer to large-view photos formed by stitching, which can be one-dimensional stitching (the most common, horizontal or vertical), or two-dimensional stitching (all horizontal and vertical stitching). According to the relative position of the photographer and the subject, it can be shot by rotating the camera, or by panning the camera (similar to the scatter perspective in Chinese painting), and it can also be shot around the subject.

Rotating the camera is the most common panorama shooting method. It is used to express the scenery around the open area, and it is easy to obtain good results. Vertical stitching can be used to represent tall buildings that are difficult to capture in one shot. Through two-dimensional stitching, it can also break through the bottleneck of digital camera resolution and produce large-scale pictures with super resolution.

For continuous distribution of shooting objects, such as a street scene, you can pan and shoot, and then stitch and stitch to form a long street view. The surface of a large circular subject can also be shot around and then stitched together, just like how a world map is represented.

Not all subjects are suitable for panoramas. The production of close-up scenery is more laborious, and moving objects are almost impossible to shoot.

3. Shooting points

Photos used for stitching panoramas have certain requirements, such as similar exposure values, similar tones, arranged in sequence, slightly overlapping each other, and so on. There are some precautions when shooting.

(1) Selection of focal length

Some people think that when taking a panoramic photo, the angle of view should be as large as possible, and therefore, the shortest focal length (wide-angle lens or the wide-angle end of a zoom lens) should be used. In this way, the number of photos that need to be stitched is small.

This is actually a kind of misunderstanding. Save trouble when shooting and trouble when stitching. Because the wide-angle lens has a strong perspective effect, especially the edges of the picture are prone to distortion. It is difficult to be seamless when splicing.

For example, in the following two films, the originally vertical buildings are distorted and skewed due to the use of a wide-angle lens equivalent to 35mm. Stitching is not possible at all unless corrected by hand in Photoshop. Therefore, when shooting, you should use the medium or telephoto end with less distortion. And it is not appropriate to change the focal length in the middle of shooting.

(2) Exposure parameters

Most digital cameras now have a dedicated panorama mode. In this mode, the camera will automatically set the exposure parameters as required for taking panoramic photos. We should note the following points for cameras without panorama function:

  1. Use average metering when metering, and use manual exposure or AE lock to lock exposure parameters when exposing. We can`t  change the aperture, speed, ISO, resolution and other settings  during the shooting of the same group of panoramic photos.
  2. Use a fixed white balance, and the use of automatic white balance may cause inconsistencies in the color tone of different photos.


(3) Shooting method

Shoot in a certain order (from left to right or from top to bottom, etc.). It is best to use a tripod to rotate smoothly. And pay attention to the vertical axis of rotation when shooting. When shooting in rotation or panning point by point, pay attention to the same height and angle of the camera. Generally do not use the flash, because the flash will cause near bright and far dark.

There should be some overlap between two adjacent photos when shooting. Some brands of digital cameras have auxiliary prompts on the LCD display in panorama mode. Avoid shooting when the lighting conditions change drastically (such as clouds obscuring the sun). So that we can avoid too much difference in exposure between frames. Also take care to avoid moving objects (such as vehicles and pedestrians) at the junction when shooting.

Although it is helpful for some automatic software to identify and splicing a position with a clear mark as the connection point, we still recommend choosing the part with no obvious mark and easy to mix as the joint, such as the water surface and distant mountains. So that it is not easy to see the seam when splicing .

Categories
Studio Lights Education

Portrait Lighting Guide – Finding the Right Light Outdoors

Outdoor Light

Nature provides every kind of light you can imagine, which explains why so many pictures are taken in natural light. We can find beautiful natural light everywhere, and it requires little post-processing.

For example, I used to work for a major publishing company that specialized in automotive publications. One of the studios we used to shoot cars was huge, with ceilings 3-4 stories high. Under the ceiling, huge diffusers are suspended from cables, and any of the four corners can be raised or lowered. A large group of incandescent lamps (12 to 16 in a group) reflects the light on the diffuser, forming a creamy white highlight on the entire body – this is the signature lighting in car photography.

We shoot in studio when outdoor public places are not suitable for shooting, or when the vehicle is only briefly lent to Motor Trend magazine. Despite the availability of this handy studio, the magazine’s dedicated photographers would prefer to photograph cars in dawn or twilight if time or weather gave them face.

When the sun is just setting or seconds after it has set, there is a brilliant skylight in the western sky. No matter how big a studio is or how much equipment it has, they can’t compete with natural light in both quality and quantity.

Find the Right Light

Shade: To take advantage of natural light, you must be aware of its different properties. It’s not like working in a studio, where you manipulate the lighting to get the desired effect. Under natural conditions, you can only find and use ready-made light, at most with a little trick to adjust a little to suit your needs. It is currently recognized that the best scene for outdoor shooting is to find a shady place away from direct sunlight.

Shade light is actually scattered sunlight. Contrary to what one can usually imagine, the light in the shade is not without direction, on the contrary, it has a very clear direction. A shady place suitable for almost all subjects, especially portrait photography, is an open space with shade in the woods.

The shade hangs over the subject’s head, blocking the sunlight. In shaded places, scattered light shines in from the sides through the gaps in the leaves, which can shape the face more than the light in the open field. With open light coming down from overhead, the resulting shadows are naturally the most unflattering. For example, the midday sun will leave a heavy shadow on the subject’s eye sockets, under the nose and chin. If you must shoot in such a situation, you must compensate for sunlight exposure with a flash or reflector in the front.

Three Elements of Light

To master light, we first have to understand how different properties of light affect our photos.

The degree of hardness, direction and color of the light are the three basic elements that determine the performance of our photos. To learn how to control light, you must first learn to judge the three elements of light, and then continue to improve the lighting of photos.

It is easier to judge the properties of light from shadows than from highlights.

Hard, directional light will leave shadows with sharp edges and strong tones in the frame, while soft light will soften the shadows. Shadows are always on the other side of the light, so they reveal to us the direction of the light source.

Location of the Light Source

The degree of softness and hardness of light depends on the distance and relative size of the light source and the subject. The smaller the light source, the harder and more concentrated the light. The larger the light source, the softer and more diffuse the light will be.

Remember, the size referred to here is not the actual size of the luminous object, but the relative size of the object we are photographing.

For example, the sun itself is huge, but because it is so far away from the subject, it is seen as a point light source when photographing.

The direction of the light determines the position of the shadow, and the combination of the two determines the texture and form of the subject. Light from the direction of the camera or from behind the camera will leave shadows behind the subject, making it appear flat in the frame.

Such light is great for detailing, but not the texture or shape of an object. Light from the side of the subject creates more interesting results. We call this kind of light as side light, and the shadow is on the other side of the subject, which can fully show the texture and outline of the subject.

When going out to take pictures at noon, the most common situation is that the light source is directly above the subject. Taking pictures in these conditions, the results are not ideal. Portraits in particular, where the eyes are completely in shadow, and there is also a thick shadow under the nose and cheeks.

The soft light of cloudy weather is perfect for detailing in macro photography.

Fill Light for the Dark Part

There is another way to reduce the overall contrast of the picture when taking pictures in bright sunlight. Use a reflector to reflect sunlight onto the subject of the frame, increasing the brightness of its shadows. Unlike diffusers, reflectors do not soften the light, but reduce the contrast between the brightest and darkest parts of the subject.

The use of the reflector is as simple as placing it on the other side of the light source and adjusting the angle so that the reflected light just brightens the shadows of the subject.

There are many types and specifications of reflectors on the market. We can also use white cardboard to make our own, and even cover the surface of the cardboard with more reflective gold or silver foil.

Using reflective materials of different colors can bring different picture effects. The white reflector has a natural fill light effect, the silver reflector has a strong fill light effect, and the gold reflector can make the shadows appear warmer.

Use a reflector to fill in light on subjects in the shade for great outdoor portraits.

Use flash

Another way to brighten shadows in strong sunlight is to use a flash instead of a reflector. When the subject is close to the camera, the built-in flash can do the job, but it can’t reach the subject two or three meters away.

In this case, we have to use a higher-power standalone flash. Use flash fill light to improve ugly shadows created by direct sunlight.

No fill light

Flash fill light

Categories
Studio Lights Education

How to Improve the Visual Impact of Your Photos

Brief Introduction

Photography enthusiasts often encounter such a situation: a real scene feels very vivid to the naked eye, and the visual effect is also good. But when it is taken into a photo, it is not so good-looking, and even becomes bland and disdainful.

Appreciation of works with visual impact effects-1

This gap between the photo and the real always makes people feel confused and frustrated, and it also casts a gray shadow on his creative enthusiasm. Where is the sticking point? The human eye is a wonderful sense. Due to the existence of binocular stereo vision, people can distinguish the distance and three-dimensional composition of objects, and photos transfer the three-dimensional information in the plane, so it is naturally more expressive than the real scene. Missing a sense of stereo.

Based on the defects of the transmission medium itself, we must focus on creating the advantage of plane, that is, to create a photo with a strong plane visual effect. This is what we often say about improving the visual impact of photography as much as possible.

Appreciation of works with visual impact effects-2.

1. The Choice of Photographic Vision

Not all scenes in the world are suitable for photography. Photographers should improve their “eyesight”, observe the scene with photographic vision, and make choices about the subject.

The essence of photographic vision is an ability of imagination and judgment. Because photographic imaging and human eyes are similar in many aspects, people mistakenly believe that photographic vision is human eye vision, and the result is bound to cause the picture effect to be far from the actual feeling.

For example, people’s visual perception of a scene is often not a single one, and is also affected by the comprehensive environment of the scene, such as smell, touch, hearing and so on. When these sensations are pleasing, it enhances the aesthetics of the vision. Conversely, when these sensations are impacted and people are disgusted, the visual effect will also be weakened.

The photographic vision is single, it has no hearing, smell, touch and so on. Therefore, before shooting a moving scene, the photographer should suppress various senses other than vision, observe the scene with photographic vision alone, and see how much of the scene can be recorded and expressed by the camera. If the photographic vision is still meaningful in all the senses, then the scene is worth photographing, otherwise it should be abandoned. This is an important prerequisite for improving the visual impact of the work.

Appreciation of works with visual impact effects-3.

2. The Choice of Exaggeration

Photography is a form of artistic expression with documentary characteristics. Photographers can use certain artistic expression techniques to enhance the visual effect of their works without violating the basic characteristics of photographic documentary, among which the “exaggeration” technique is the most common and practical.

For example, in order to enhance the atmosphere of the picture and the effect of tone, color filters can be used to enhance the attractiveness of the photographed scene. For example, when shooting a snow scene, add a blue filter to emphasize the depth and coldness of the snow scene. Shoot the sunrise using a red filter to highlight the vigor of the rising sun. Shoot blue sky and white clouds, use polarizers to increase the contrast between blue and white, etc.

For another example, in order to make a part of the scene stand out, a close-up or a large close-up can be used. Use the incomplete picture image to express the complete theme, so that the photographic picture changes from complicated to concise, from rough to delicate.

For another example, in order to increase the expressiveness of the work, a short focal length lens can be used to facilitate the shooting of large scenes at close range. Shooting with a short focal length lens often gives people an unusual sense of novelty due to the change in the perspective relationship of the picture. This method is now mostly used for news scene shooting with special significance.

Appreciation of works with visual impact effects-4.

3. Selection of Composition Position

The visual effect of the work is inseparable from the composition and position chosen by the photographer. It mainly includes three aspects: distance, direction and height.

shooting distance

The shooting distance is the distance between the shooting point and the scene being shot. The difference in the shooting distance will bring about changes in the scene of the picture, resulting in changes in the composition. For example, if you choose to shoot from a distance, the range of the subject to be photographed is wide and far-reaching, and it is good at expressing the momentum of the scene. Choose panorama shooting, the scope of the subject is smaller than the distant view, and it is good at expressing the whole picture of the main subject and the characteristics of the environment in which it is located.

If you choose to shoot in a medium shot, the scope of the subject is relatively narrow. It is good at expressing the relationship between people, people and things, and things and things, and wins by plot. The choice of close-up shooting is to highlight the main part and main appearance of the subject, and is good at making delicate depictions of the demeanor of the person or the main appearance of the scene.

Appreciation of works with visual impact effects-5.

Shooting direction

Orientation means that the shooting point is on the front, back, or side of the subject. Frontal shooting means that the camera is facing the front of the subject. This direction is conducive to expressing the frontal image of the subject. It is good at expressing symmetrical beauty and can produce a sense of solemnity, majesty and tranquility. Side shot, including left and right oblique side, is the most used direction in photography. When shooting, the horizontal line of the subject itself will become a convergence line with strong perspective effect on the screen, which helps to express the three-dimensional and spatial sense of the scene. The picture is also easy to appear vivid, which is also conducive to highlighting the subject.

Appreciation of works with visual impact effects-6.

Shooting height

The height is the horizontal height of the camera parallel to or higher or lower than the subject, namely “flat shot”, “upward shot” or “overhead shot”.

Flat shooting helps the audience to have an immersive visual experience of the picture, and also helps the subject to block more background characters or scenes on the screen, so that the subject is more prominent.

Shooting upside-down helps to emphasize and exaggerate the height of the subject, helps exaggerate the upward leap of the jumping body, and helps to express the high and upward spiritual outlook of the characters. It can also set off the subject scene in the sky to the greatest extent, so that the picture has a kind of unrestrained feeling.

The biggest feature of overhead shooting is that the front and rear scenes can be fully displayed on the screen. Helps to emphasize the number of subjects, the grand scene. It is helpful to explain the geographical location of scenery and characters. It helps the picture to produce rich scene layers and a far-reaching sense of space. And also helps to show the beauty of lines of the earth.

Appreciation of works with visual impact effects-7.

4. Selection of Color Configuration

To attract people’s attention to photography, it is not the more colors the better. But the choice of the color configuration around the prominent subject. Using color to highlight the subject mainly relies on the contrast effect of color to achieve the purpose of highlighting the subject in the contrast of colors, thereby improving the visual impact of the work.

Appreciation of works with visual impact effects-8.

(1) Choose a contrast between cool and warm colors

Cool and warm colors are corresponding colors on the color wheel. Arrange them together, it is easy to produce a sense of visual beating and form a strong contrast effect. The photographer can process the subject and the background environment into different cool and warm tones. So as to obtain the prominence of the subject.

Appreciation of works with visual impact effects-9.

(2) Choose complementary color contrast

Complementary colors are positioned opposite on the color wheel and have a strong contrasting effect. Complementary or near-complementary colors are arranged in a work at the same time. This will make the picture have the characteristics of color contrast and leave a deep impression on the audience’s vision.

Appreciation of works with visual impact effects-10.

(3) Choose a bright and dark contrast of colors

Due to the difference in saturation between various colors, there are bright and dark differences. Colors with high saturation appear vivid, and colors with low saturation appear dull. If the bright colors and dark colors are configured together, the bright colors can further enhance its gorgeous feeling. If there are some brighter colors in a darker color background, these colors will stand out. The photographer can take advantage of this principle to make the subject have a higher saturation. The brighter colors, the less saturated and darker background colors, can make the subject stand out.

Appreciation of works with visual impact effects-11.

In short, there are many ways to improve the visual impact of photographic works. And photography enthusiasts should master and use them to make their works more eye-catching and touching.