Table of Contents
What is Foreground
In portrait photography, the foreground generally refers to the scene that is close to the lens in front of the subject. If these scenes are used properly, they can add atmosphere to the picture, beautify and highlight the subject, and at the same time, they can also explain the time and place of the characters. In addition, the foreground also plays a certain role in the performance of the character’s character and state. Usually, trees, flowers, roads, and water surfaces are used as the foreground, and people and objects can also be selected as the foreground.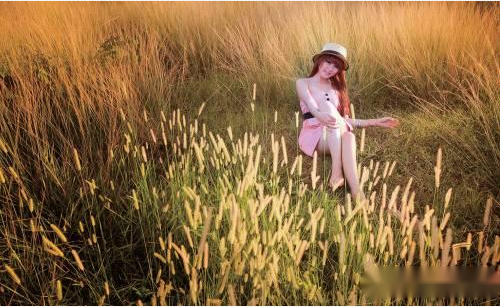
With the transparent thatch grass as the foreground, it sets off the picture, and the atmosphere is very beautiful.
Focal Length: 30mm, Aperture: F8, Shutter Speed: 1/250s, Sensitivity: ISO100
1. Use the Foreground to Set off the Subject and Render the Atmosphere
Using foreground blur to set off the scene and highlight the subject is also a very important form of expression. Similar to the background blur, the foreground can also be blurred by blurring, the foreground is close to or close to the lens, and using a large aperture to blur the foreground can not only highlight the subject, but also make the picture more dreamy and soft.
In addition, you can make full use of the foreground object as a frame to form a framed composition. This composition method can enrich the scene level of the picture, strengthen the sense of space of the picture, and can also decoratively beautify the picture and enhance the sense of form of the picture. When shooting, you can often consider using windows, doors, branches, shadows or hands to create a “frame” for the subject.
2. Blend the Model into the Environment by Blurring the Foreground
In addition to decorating the picture with the background, the foreground is also a very important form to set off the atmosphere of the scene. The foreground can be blurred by blurring, so as to highlight the main character.
This shooting method is very common when shooting outdoors. For example, you can place the model in the reeds or wildflowers, and blend the model with the environment by blurring the foreground, adding a sense of harmony to the picture.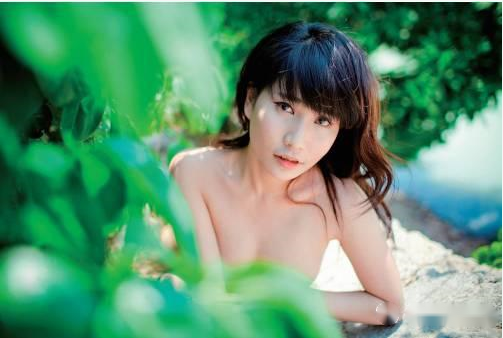
The leaves are blurred because they are closer to the camera, highlighting the beauty in the picture, and the picture is natural and fresh.
Focal Length: 80mm, Aperture: F2.2, Shutter Speed: 1/320s, Sensitivity: ISO100
3. Use the Foreground to Enhance the Sense of Space and Perspective of the Picture
When shooting portraits, you can use the characteristics of large foreground images and deep tones to form a volume contrast or a contrast of color tones with distant scenes to enhance the sense of space in the picture. This is actually a specific application of the principle of perspective in photography. Moreover, it can be inferred from the perspective principle that the greater the difference between the proportion of the area occupied by the foreground and the characters in the picture, the stronger the sense of space in the picture.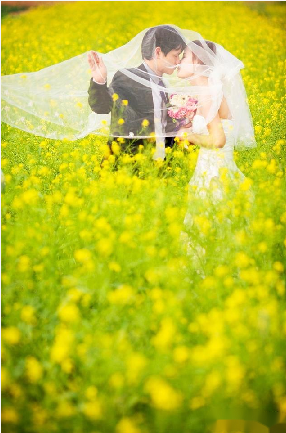
The large canola flower in the foreground echoes the kissing lovers in the foreground, showing good wishes for life.
Focal Length: 135mm, Aperture: F2.8, Shutter Speed: 1/200s, Sensitivity: ISO100
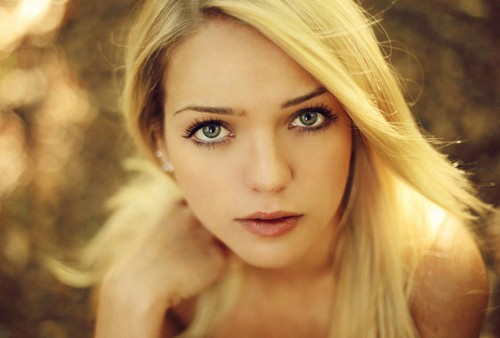
4. Delicate, Delicate Faces are Expressed by Face-to-Face Metering
For shooting portraits, the skin is the part that needs to be highlighted. And to express delicate, smooth skin, metering is a very important job. To be precise, when shooting portraits, you should use center-weighted average metering or spot metering mode to meter the skin of the person.
If it is in a strong light environment in the afternoon, we recommend to find a shadowy place to shoot. If the environmental conditions do not allow it, you can meter the highlight areas of the skin and fill in the shadow areas.
When shooting outdoors, if the light is strong, use the skin of the person as the exposure standard when shooting. And appropriately increase the exposure compensation of half or 2/3 stops. So that the skin can get enough light to appear smooth and delicate. The exposure of other areas does not need to be too scruples. Because compared with other areas, girls are more concerned about their skin.
When shooting outdoors, use the telephoto end to zoom in on the model’s face to fill the frame, then perform metering, lock the exposure. And then recompose the shot to get a portrait with delicate skin.
Focal length: 200mm Aperture: F2.8 Shutter speed: 1/200s Sensitivity: ISO100
5. Increase Exposure Compensation When Shooting Light-colored Images
When there are mostly light colors in the picture, the camera will get inaccurate data based on the metering results. At this time, we should increase the exposure to increase the brightness of the picture.
When the subject is wearing light-color clothes and shooting in a white environment, you should increase the exposure compensation . So that the picture can truly reproduce the shooting scene and obtain a more accurate exposure effect.
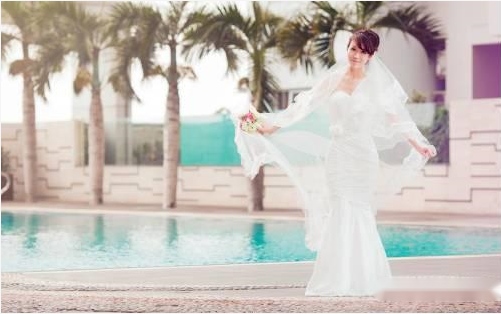
Because the model was wearing a white wedding dress and was in a light-toned environment, exposure compensation was added during the shoot. And this result in a bright, high-key image.
Focal Length: 35mm, Aperture: F2.2, Shutter Speed: 1/640s, Sensitivity: ISO100
6. Decrease Exposure Compensation When Shooting Dark Images
If the subject is in a dark environment and dressed in black clothes, the camera’s own metering system will increase the exposure value accordingly according to its own metering results. This will result in a grayish picture. We should reduce the exposure compensation in order to correctly restore the perception of dark colors. In order to make the girl’s skin fairer, you can use the reflector to fill the face.
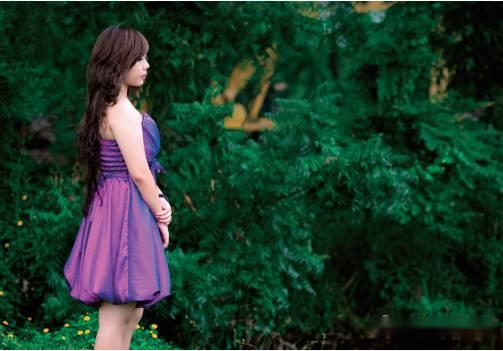
As we reduced the exposure compensation when shooting, the dark green leaves were even more darken. So the girl in purple standing in front of the leaves appeared highlight.
Focal Length: 90mm, Aperture: F2.8, Shutter Speed: 1/200s, Sensitivity: ISO400
7. Use Exposure Compensation to Remove Clutter from the Frame
When the environment in the picture is cluttered and not conducive to highlighting the subject, overexposure can be used to remove the details that are not conducive to expressing the subject.
This method is suitable for environments with relatively large amounts of light. When the subject is brighter and the environment is darker, you can use the method of reducing exposure compensation. In this way, the darker environments in the picture are in the dark, no cluttered details can be seen in the picture. And the characters are properly exposed. Against a darker background, the skin appears fairer.
When shooting in a brighter environment, you can shoot by increasing the exposure compensation. This can cause cluttered details in the environment to be overexposed and lose some detail. While people who would otherwise be darker will have their faces brightened by exposure compensation.
In general, this way of shooting is to ensure that the subject is properly exposed, while ignoring the details of the environment.
Due to the low light in the shooting environment, photographers need to reduce the exposure compensation when shooting. That darkened the cluttered environment and made the model stand out more in the picture.
Focal length: 50mm Aperture: F1.8 Shutter speed: 1/250s Sensitivity: ISO100

When shooting in a bright environment, in order to make the cluttered background not stand out, the exposure compensation is increased when shooting. So that the background almost expose to be white. The bright picture set off the model’s temperament more elegant.
Focal length: 45mm Aperture: F3.2 Shutter speed: 1/250s Sensitivity: ISO400