Table of Contents
Comparison of the Effects of Different Studio Lights
What is the difference in effect when using different lampshades (soft light tools) when shooting portraits?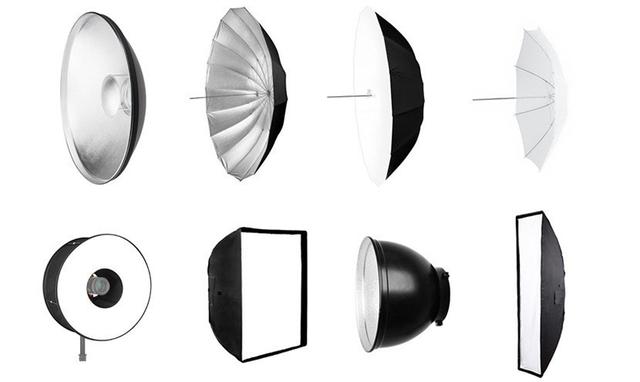
Radome
The radome is a very common photographic tool. The light is more concentrated and the contrast is greater, and the generated light can highlight the details of the skin and face. You can also make a nice look. Photographers often use this light in fashion and makeup photography.
There are white and silver radomes on the market. Silver light is harder, white is softer.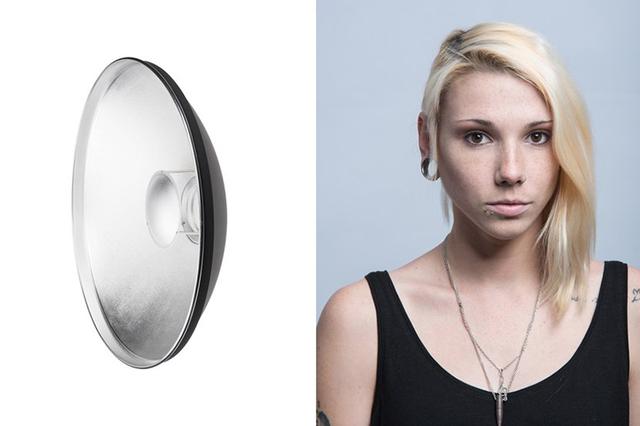
Standard Hood
Every photography lamp is basically attached with this lampshade. The light produced by it is harder, direct light. When shooting a model, there is a strong shadow contrast. If you don’t want the contrast to be too exaggerated, you can also hit the light on the white wall and reflect it back.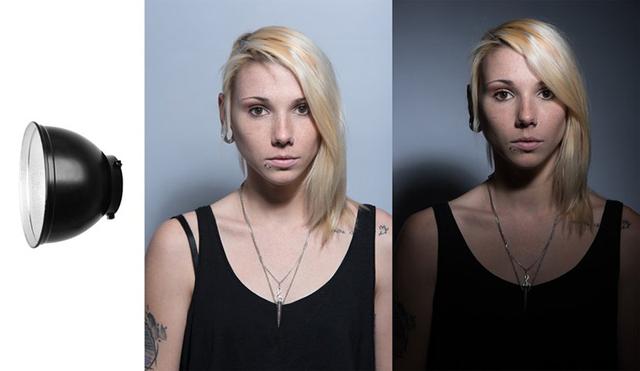
Soft Light Umbrella and Reflective Umbrella
Because there are so many forms, the choice of soft umbrella is not an easy task. Let’s start with my favorite silver soft umbrella.
This soft light umbrella contains two reflective materials, silver and white. The silver side is used to create more contrast and harder light. When the light passes through the white cloth, the light is further softened. Therefore, this soft light umbrella not only guarantees a certain contrast, but also does not make the light too hard.
The biggest advantage of the soft umbrella over other tools is that it can be quickly accessed and does not take up much space when folded. The size of the soft light umbrella is more diverse, ranging from 75cm to 1.8m. I personally recommend the 95cm size. If you want to use 1.8m, you must have a larger studio.
Of course, you can also choose a pure silver soft light umbrella or a white soft light umbrella. Like the previous two tools, silver is used to shoot high-contrast, bright and dark effects. White is used to soften the light to the greatest extent, creating a soft-looking portrait.
Ring Flash
The ring flash surrounds the camera lens, and the shadows are not very noticeable. It can also make a ring-shaped catch light, which is more dreamy, and can be used in conjunction with other lighting methods.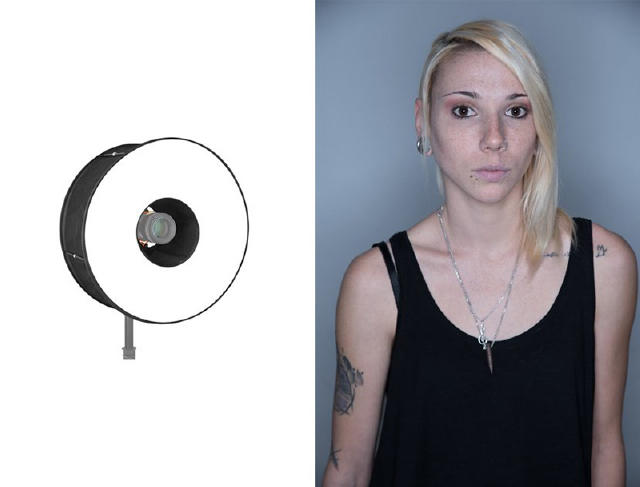
Softbox
Softbox is also one of the most commonly used tools in shooting. In addition to the shapes shown in the figure, there are also square, rectangular, octagonal, etc. The larger the softbox, the more scattered the light will be.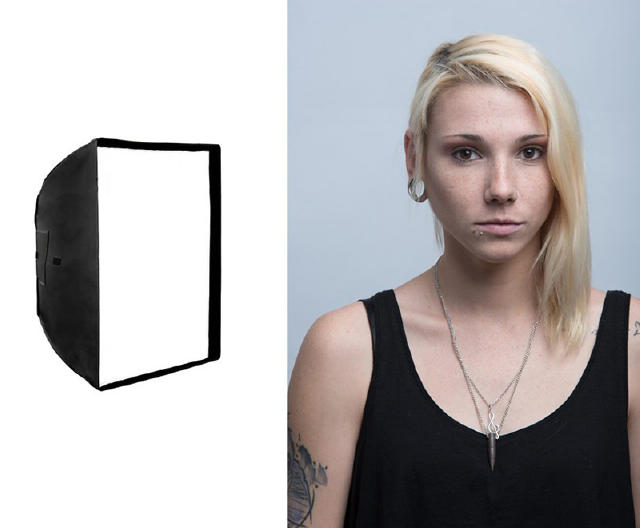
Long Soft Box
The long-striped soft box, if used to shoot the whole body, the light will be more average than simply using the square soft box.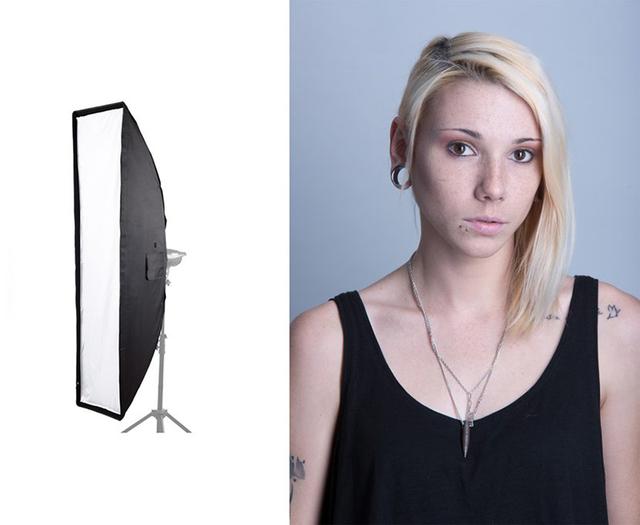
Portrait Photography Angle
The shooting angle includes shooting direction and shooting angle. The choice of shooting angle is very important in portrait photography. Different shooting angles will have different effects on the image and charm of the subject. Beginners should pay attention to the personality characteristics of the characters when taking portrait photography, so as to choose the appropriate shooting angle.
1. Front
Frontal refers to the subject’s face facing the camera, at a zero angle to the lens. For frontal half-length portraits, this shooting angle will focus on the facial contours of the characters, giving people a dignified, steady, symmetrical and harmonious feeling, and at the same time enhance the realism of the characters. Photographers should note that for subjects with obvious asymmetry in facial features, they need to avoid frontal angle shots.
2. 1/3 Side
1/3 side refers to the angle between the face and the camera lens of about 30°. This shooting angle can improve the overly symmetrical and dull frontal situation, and make the photos look more relaxed and lively. In addition, this angle is suitable for a slightly fatter or thinner main character. And it can better make the photos appear three-dimensional.
3. 2/3 Side
2/3 side refers to the angle between the face and the camera lens of about 60°, which is an angle that is often used in portrait photography. Generally adopting this angle can effectively improve and beautify the shortcomings and shortcomings of the characters themselves. In addition, if the subject is fatter, using this angle can often achieve a significant “weight loss” effect. Of course, this angle is not suitable for subjects with high cheekbones and sunken cheeks. This often makes the shortcomings more obvious and prominent.
4. Full Side
Full side shooting can show the profile and body lines of the model. Since shooting in this direction can fully express the profile of the model, it is often used when shooting silhouette photos. At the same time, side shooting has a strong dynamic effect and directionality, so when shooting people moving forward at high speed, the side direction is often used.
5. Aerial Shot
Using a high-angle overhead shot can make women’s faces petite and produce a “melon-seeded face” effect. Of course, this angle is more suitable for women with wider and fatter faces. For those subjects who are thinner and have a small face, it is not suitable to shoot at this angle.
In addition, when shooting a full-length portrait of a person, this angle can make the person short, resulting in a large head and a small deformation effect, so a cartoon effect can be obtained in a certain sense.
6. Looking Up
When shooting a frontal bust of a person, the upward shot can narrow the forehead of the subject, enlarge the lower jaw, lengthen the head and neck, and make the face full, and show the subject’s height and slenderness. At the same time it also played a role in purifying the background.
In addition, when shooting full-length portraits of women, using this angle can express women’s slender legs and graceful body. But for people who have a small upper part and a big lower part, the angle of frontal shots cannot be used. Because this angle will expose the shortcomings of the subject’s task more.