Table of Contents
Seascape Photography
Shooting of dynamic seascapes
We often have the opportunity to go to the coast to shoot, but how can we capture stunning images?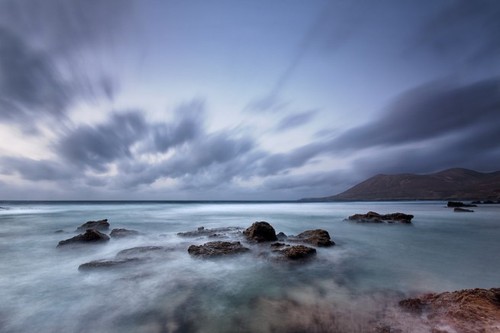
Tip 1: Use a wide-angle lens
The photographer used a 10mm wide-angle lens to make the picture more magnificent and to capture more surrounding environments. If you can shoot the wide-angle lens slightly upward, the effect will be even more shocking!
Tip 2: Choose the right time and weather
Appropriate time and weather are very important for photographing natural scenery. We can take advantage of the soft light in the early morning, and because the sun is not too strong, we can make longer exposures and capture the traces of clouds, making the picture more dynamic!
Tip 3: Long exposure to soften the water
We can also use a tripod to stabilize the camera for long exposures when shooting shores, flowing water or clouds, so that the water becomes silky smooth and looks like fog!
Tip 4: Use a CPL filter to eliminate water reflections
There are usually reflections on the sea surface. If we use a CPL circular polarizer, the reflections on the water surface will be eliminated. In this way, the world under the water will be revealed, the photos taken will be different from those seen by the naked eye, and the water will be clearer.
Tip 5: Choose a foreground to set off the subject
The foreground can enrich the picture and bring out the subject. The photographer chose the stone in the picture as the foreground. We can also use more foreground skills when shooting, and we will definitely strengthen our photography skills!
Photographing static seascapes
There is another set, blue tones, calm water and dynamic sky, combined into a wonderful photo with movement and stillness, even if you are a novice! Check out a few simple points below!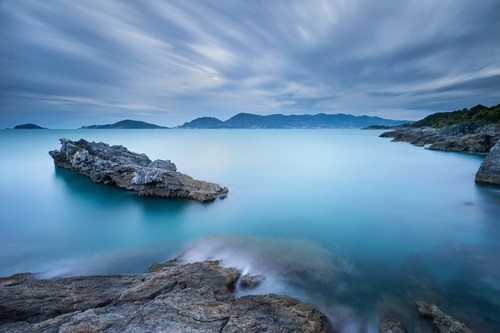
Tip 1: Bring out the blue hue
To get a bluish tone, we need to pay attention to two things.
- Shooting time: Usually in one day, the sky changes from dark to bright from 5 to 6 in the morning, and the sky photographed at this time will be relatively blue. The sky after sunset is also fine, but it is easy to take in the warm sunlight. Therefore, we recommend getting up early and shooting at the beach!
- White balance: Using automatic white balance may not produce the desired effect. We can set the white balance to a low K number or “tungsten light” to make the photo more blue.
Tip 2: Long exposure to smooth the water surface
Use a tripod, small aperture, low ISO and long exposures to smooth the water surface, as well as manual mode or S-mode/Tv-mode. The general exposure can be from a few seconds to tens of seconds, or even a few minutes, but be careful with overexposure, and use an ND filter if necessary.
Tip 3: Prospects and the application of the rule of thirds
Many great photos also contain a foreground, and the foreground in the photo is the rock. The “rule of thirds” requires special attention when photographing coastlines. We can put the sky and the sea at the junction of one third of the picture, whether it is the top third or the bottom half. The former highlights the foreground (such as rocks, sea), and the latter highlights the sky.
Waterfall Photography
Shooting of small waterfalls
The photo is so dynamic and dynamic, and the composition is of a certain level. In fact, shooting skills are not difficult, even beginners can easily do it! Now let’s see how to take this waterfall photo together!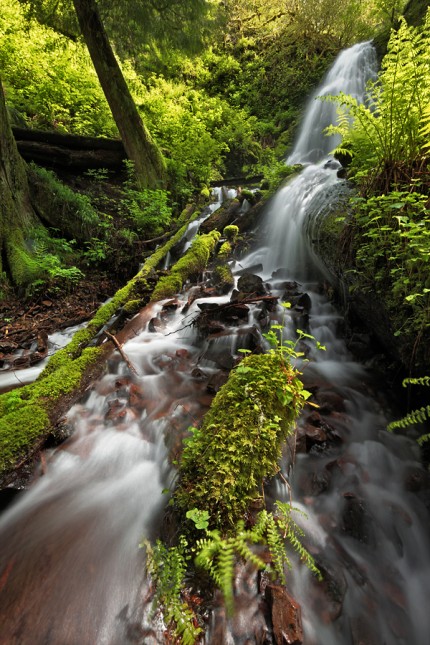
Tip 1: Slow shutter to shoot flowing water
A slow shutter can turn the water of a waterfall into silky smoothness, so hold the shutter down to 1/20 of a second or even a few seconds, and your photos will have mist-like water! Of course, use a solid tripod!
Tip 2: Use a Gradient Gray GND Filter
Sometimes when the sun shines on the location of the waterfall, one side of the photo will be overexposed and the other side will be underexposed, which greatly reduces the effect. The solution is to use a GND Filter to balance the exposure.
Tip 3: Use CPL Filters
Have you seen the mud under the waterfall? If you shoot directly, the reflections on the water surface will be captured and not so “clear”. To take pictures of things under running water, you can use the CPL filter! Also, this super useful filter can also reduce reflections on stones.
Tip 4: Triangle composition
Triangular composition can make the photo smooth and can also play the role of “leading lines”!
Take a look at this group again, waterfall photography with different styles.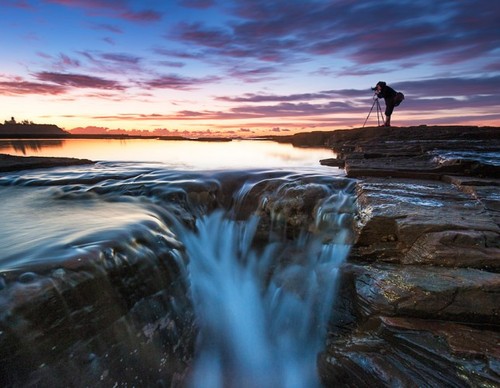
Shooting tips for large waterfalls
Tip 1: Three Elements
A wonderful photo often contains 3 elements (up to 3, otherwise it will become cluttered), this photo contains:
- Warm sky
- Photographer
- Silky Waterfall
We can also try to find three elements to make the picture richer when shooting.
Tip 2: Balance sky and ground exposure
Usually shooting this kind of photos, novices will often shoot directly. Due to the large light difference, one is that the sky is exposed normally and the ground is too dark, or the ground is clear but the sky is overexposed and becomes dead white, resulting in unsatisfactory results. One solution is to use a graduated gray filter to balance the exposure. For the introduction and usage of gradient gray filter, please refer to the following.
Tip 3: The Rule of Thirds Composition
This composition method is one of the must-learn methods for all beginners, and it is easy to operate. Just put the target in one-third of the screen. It seems that the portraits and horizons in the photo also apply this technique. Please refer to our previous article for details on the rule of thirds composition.
Stream Photography
Rapids
Running water has always been a very easy but attractive subject, whether you are a novice or a veteran, you can do it and take stunning pictures. Take a look at the key points of this photo shoot, and then go do it this weekend!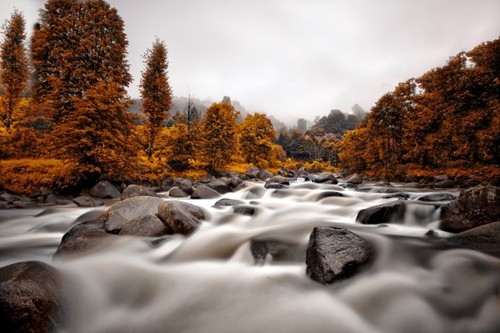
Camera Canon EOS 5D Mark II
Focal length 16mm
Shutter 82 sec
Aperture f/6.3
ISO 100
Tip 1: Slow shutter to shoot flowing water
We usually use manual mode (M-Mode) to shoot flowing water, then lower the ISO, lower the aperture, and slow down the shutter according to the smoothness of the water flow.
Tip 2: Use ND Filter
If the shooting is in broad daylight, there is a chance that the photo will be overexposed due to the slow shutter speed. At this time, you can add a light filter (NDFilter) to reduce the entry of light and make the shutter slower.
Tip 3: Select colors locally to increase contrast
We can go through a simple post technique to pick the golden leaves, then increase the saturation and contrast, and lower these two settings for the rest. This will make the yellow leaves stand out even more!
How can you miss the fantastic scenery? How can I take this picture like an oil painting? Don’t worry, let’s see the little secret in it!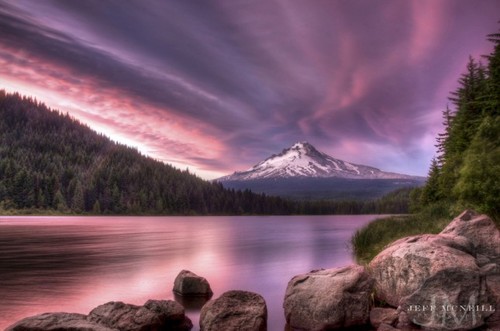
soothing
camera NIKON D90
Focal length 18mm
Shutter 5 sec
Aperture f/22
ISO 100
Tip 1: Slow shutter makes the water slippery
The slow shutter (5-second shutter here) makes the water silky and adds a touch of poetry to the film.
Tip 2: Make HDR Photos
HDR photos can balance and show the light and dark levels in a photo. It is usually the result of combining multiple photos with different exposures. For example, you can take 5 photos with different exposures in the same environment – from -0.5EV, -0.3EV, 0, +0.3EV, +0.5EV, and then post them in the computer. Now the software is very powerful and can achieve similar results with a RAW photo.
Tip 3: Adjust the tone
To make the sky appear a purple “dream” color, in addition to the actual color of the sky at that time, we can also set “Image > Adjustments > Hue/Saturation” in Photoshop, and adjust Hue under “Reds”. !
Summarize
The above techniques are not difficult, the most important thing is to shoot at the right time (like the Magic Hour twice a day). Of course, it is not terrible and hard work, because often beautiful scenery also requires physical effort to find!
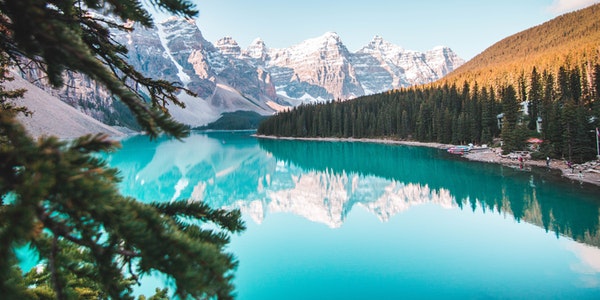
Reflection
Reflection in the Lake
This photo is very dynamic and still, and it also contains several shooting techniques. Let us learn about the shooting techniques, which can be applied when encountering similar environments!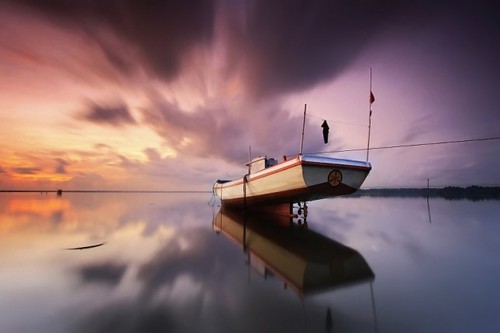
Camera Canon EOS 60D
Lens 10 – 22mm
Focal length 10mm
Shutter 60 sec
Aperture f/22
ISO 100
Tip 1: Shoot dynamic clouds with slow shutter speed
When there is wind, clouds are actually mobile. We just put the camera on a tripod and open the shutter for a few seconds to tens of seconds, and the photo can capture the flowing clouds! But be careful that slow shutter speed will increase the exposure, we need to reduce the aperture (f/22) and ISO (100) accordingly.
Tip 2: Shooting water reflections
Because of the slow shutter (60 seconds), the water becomes silky smooth and reflects the boat like a mirror. So let’s take a photo of the reflection of the boat as well! Note that if the wind is strong, the boat will shake, and it will become unclear at slow shutter speeds.
Tip 3: Take a picture of a purple sky
To add purple to the sky to make it more psychedelic, we can adjust the Tint (color) settings in the camera if necessary, so that the sky will be purple.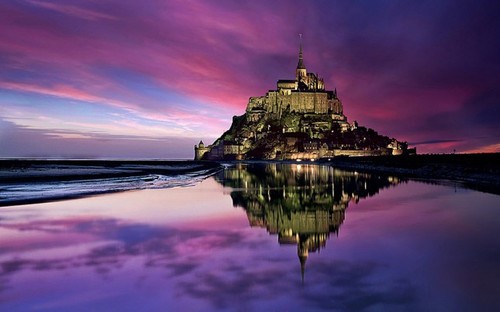
Reflection by the Sea
Camera D3s
Lens 24-70
Focal length 24mm
Shutter 80 sec
Aperture f/8
ISO 400
Tip 1: Use the water surface as a reflection
As long as we mount the camera on a tripod and take a long exposure, we can also capture the reflection on the water surface. If the water flow is calm, the image will be clearer. Sometimes the reflection is not enough reflective and dark, we can use the “black card” to increase the reflection of the water surface.
Tip 2: Aperture and ISO Considerations
When shooting a night scene, in order to make the scene of the photo clear, we will use a small aperture (such as f/8-11), but the small aperture will reduce the amount of light entering. Therefore, we can increase the shutter opening time or increase the ISO. The ability of current cameras to de-noise in general is also very good, especially when using full-frame cameras, ISO400-800 is no problem at all. Therefore, you can choose to slow down the shutter or increase the ISO according to your personal needs. But the former requires a stable tripod to avoid blurred photos, be careful!
Tip 3: How to shoot a purple magic sky?
If the sky already has beautiful colors at that time, you can shoot directly. On the contrary, we can adjust the “Hue” option in the camera, so that the color of the photo will be more magical.