Table of Contents
Six Basic Lighting Layouts for Photography
- Split Lighting
As the name suggests, dividing the face into two, one side light and the other dark, will create a stronger sense of drama, suitable for characters with strong personality or temperament, such as artists, musicians, etc., of course, the masculine taste will also be stronger.
To create this effect, place the light source at 90 degrees to the left or right of the object, and move it forward or backward slightly to accommodate different surface shapes. Note that the lighting must follow the subject’s face and change. When the head is turned, the light should also follow.
2.Loop Lighting
This method allows the nose to cast some shadows on the cheeks. To achieve this effect, the light source should be slightly higher than the eyes and the camera’s plane by 30-40 degrees. (Depends on the specific face shape)
This is a very common technique, but a common mistake is to place the reflector too low, and the light hits the nostrils, so that the desired effect is not produced.
- Rembrandt Lighting
The reason for this name is precisely the lighting technique often used by the painter Rembrandt in painting. The triangle of light on his face is the mark. Unlike the ring lighting, the shadows of the nose and cheeks are connected, but more importantly, the eyes on the shadow side still have eye light to maintain a bright and vibrant appearance, and the photos are also dramatic.
When shooting, the subject should be slightly turned away from the light source. Of course, the position of the light source should be higher than the head, so that the projection of the nose is connected with the projection of the cheeks. However, not everyone is suitable for this lighting. People with larger cheekbones are ideal, while those with a low nose bridge are more difficult. Therefore, a good lighting should be changed according to the specific subject, and cannot be generalized.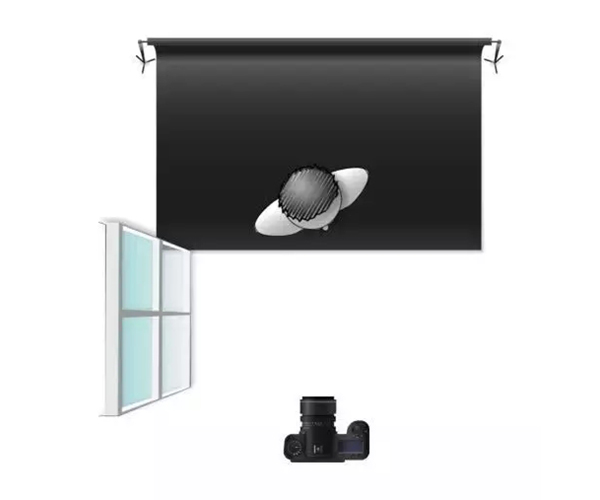
- Paramount Lighting
Paramount Lighting is also known as Butterfly Lighting. This lighting is named after the butterfly-shaped symmetrical shadow created under the nose.
The light source is set to the front light behind the camera, which will create shadows on the cheeks and chin, so it will accentuate the cheekbones, and make the face look thinner and the chin sharper, which can enhance the charm of the subject. However, reflectors are sometimes used as supplementary light.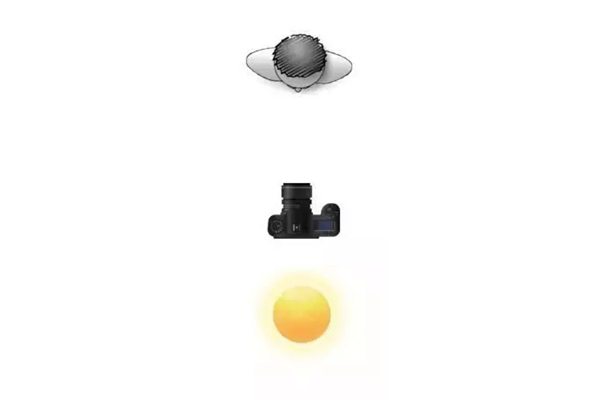
- Broad Lighting
This is not a specific lighting setting, but a style, which can be used regardless of division or circular lighting.
The method is actually very simple, that is, turn the light-receiving side to the lens, so the light-receiving side will look wider, and then the entire face will look larger and wider, suitable for people with thin faces.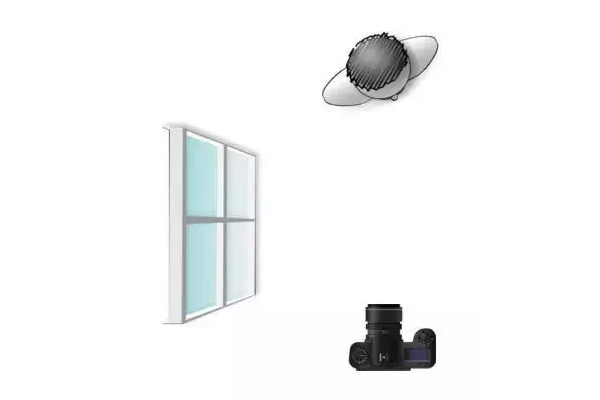
- Short Lighting
Contrary to the wide light, the darker side faces the lens, so that the face looks sharpened and has a more three-dimensional effect and atmosphere.
The lighting method is the same as that of the wide light, but in the opposite direction.
Lighting effects of different types of light
Lighting effect of front side light
Use a light (with or without soft box, soft light umbrella and other accessories) as the main shaping light-called the “main light”-from the camera side to the shooting direction about 300-600 position Illuminate the subject to form a “front side lighting effect”. It is characterized by that most of the subject (especially the face) is directly exposed to light to form a bright shade, and a small part of the area is not directly exposed to light to produce shadows. Therefore, it can both It shows the three-dimensional sense of the subject, and the overall tone appears bright, so this is a relatively successful lighting method.
If only one lamp is used for lighting, the tone of the subject’s shadow will appear too deep and too heavy, which not only promotes the necessary details, but also the color of the shadow is not good, so a second lamp or reflector is needed for auxiliary lighting , Improve the brightness of the shadow part, and maintain a proper brightness ratio with the bright surface (commonly known as “light ratio”), this kind of light is called “auxiliary light”.
The strength of the auxiliary light determines the size of the light ratio and is inversely proportional to the light ratio. The weaker the auxiliary light, the greater the light ratio. As for whether you need to add a background light to illuminate it depends on the specific situation. When the main light and auxiliary light are arranged properly, if the background light and dark tones meet the requirements, there is no need to add the background light. If the background light and dark tones need to be adjusted, add the background light and then adjust until the ideal state.
Using front side lighting, the main light usually needs to be slightly higher than the subject’s head, but not too high, lest the subject’s eye sockets, nose shadows, and chin projections are too heavy. But when the subject wears a hat or other head accessories to shoot, the main light should basically move its position to the subject’s face shape to adjust the ratio of the subject’s bright and shadow sides to make the subject’s face The “borderline of light and darkness between the bright surface and the shadow surface is in the proper position. Remember, it is very important!
If you use a reflector for auxiliary lighting, you can place it on the side of the subject’s shadow. However, if a light is used as auxiliary lighting, it should be placed as close to the camera as possible. Some people like to place the auxiliary light on the side of the shadow of the subject, but it is not as effective as the auxiliary lighting from the camera direction, because the latter is easier to eliminate the unlit “dead corners” and it is also convenient to make it on the dark eye of the photographer The reflected light spot falls on the right place. The auxiliary light should not be too high. When the light spot formed on the black eyeball of the subject can fall on the upper edge of the pupil, its height is the ideal height.
When the subject’s face is turned slightly to the side, when viewed from the shooting direction, the faces on both sides of the nose must have a narrower and wider side. If the main light is projected from the narrow side, it is called “narrow light illumination”, if the main light is projected from the wider side, it is called “wide light illumination”. Wide-light illumination can easily reveal the nose shape of the subject, and can emphasize the beauty of the nose shape. However, if the nasal bone is too high or too low, wide-light illumination is not suitable. Those with fat cheeks and protruding jaws (located on the side of the face below the ears) are not suitable for wide-light illumination.
Use the front side light to shoot portraits. Since the main light is slightly higher than the subject’s head, there will be a little projection on the nose and chin. For a full-body portrait, it is not necessary to adjust its projection, because it occupies a small area in the whole portrait and is not easy to detect. If you are shooting half-length and close-up portraits, you can place a white foam plastic board in front of the subject or on the knees, and use its soft reflection to dilute the projection of the neck. According to many years of experience, using foamed plastic boards is better than placing a small soft box on the ground.
Downlight lighting effect
The main light is projected from the camera direction to the subject, forming a “downlight lighting effect”. The characteristic is that the subject’s overall light is relatively uniform, the tone is bright, and there is no obvious shadow and projection. Under light illumination, the three-dimensional sense of the subject’s face is not formed by the amount of light received, but determined by the curve of the face itself-the convex parts are bright, and the side and back parts are slightly darker. Therefore, the face exposure is not suitable Excessive, otherwise it will affect the portrayal of the entire image.
Downlight lighting can be done with two lamps or one lamp: two lamps, usually two flashes with the same power plus a soft box, are located at the same distance from the left and right sides of the camera, slightly higher At the height of the camera, the light is projected to the subject, and the two soft boxes should not be too high to avoid too deep shadows under the neck and nose; a light should be slightly higher than the camera and projected from its back to the subject. The photographer, if the shadow on both sides of the face is too deep, you can use a reflector (preferably a white foam plastic board) to dilute it.
The advantages of downlight lighting are that the tone is clean and there are few shadows. It is suitable for shooting symmetrical and young portraits. However, if the subject’s face is wide, or the sides are obviously uneven, if the downlight lighting is used, its defects will be easily exposed, so it is appropriate Use front side light and side light to illuminate the overly wide areas of the face with shadows.
Side lighting effect
The main light is projected from the subject’s side and the camera lens in a direction of about 900, forming a “side-light lighting effect.” In this case, the three-dimensional effect is strong, because half of the subject receives light directly to produce bright tones, and the other half does not directly receive light to produce shadows. Under side-light illumination, due to the large shadow area of the subject, auxiliary illumination is often required. In general, in order to make the subject’s facial tone clean, the “light ratio” of commercial portraits should not be too large.
When using side lighting, both the main light and the auxiliary light should not be too high, otherwise the upper part of the face receives more light and the lower part receives less light and the tone will appear uneven. The auxiliary light should be placed as close to the camera as possible.
When shooting a person with a fat face and asymmetrical left and right sides of the face, the side-light illumination can be used to cover the fatter cheeks, which is conducive to the appearance of the subject to be more perfect.
People with a correct nose shape and beautiful nasal bones are suitable for side-light lighting, while those with a too high or low nose bridge are not suitable for side-light lighting, because the side-light lighting will reveal the height of the nose more clearly.