Table of Contents
What is Exposure Compensation
Exposure compensation is known to people with shooting experience. Light plays an important role in shooting quality. Photography is the “calculation” of light. Digital camera is both a shooting tool and, of course, a tool to “calculate” light.
Because the photographed object is in different ambient light, how to correctly control the exposure is very important. Flash and reflector are naturally very useful, and the correct and appropriate use of exposure compensation is another effective way.
Now commercial digital cameras generally provide exposure compensation function, and the adjustment range is generally about ± 2.0eV. EV value is called exposure value, which reflects the combination of aperture size and shutter speed. EV value is also related to scene brightness and film sensitivity. Generally speaking, the faster the film sensitivity and the brighter the subject, the greater the EV value. Accordingly, small aperture and rapid exposure should be used at this time.
Exposure Compensation Method
Exposure compensation is to allow the photographer to correct and adjust the exposure “amount” determined by camera metering, so as to obtain accurate exposure suitable for the correct performance of the subject.
Exposure compensation amounts are represented by + 3, + 2, + 1, 0, – 1, – 2, – 3, etc. “+” means to increase the exposure based on the exposure determined by photometry. “-” indicates reduced exposure. The corresponding number is the number of stages of compensated exposure. The compensation amount of our general civil digital cameras is generally within the range of ± 2.
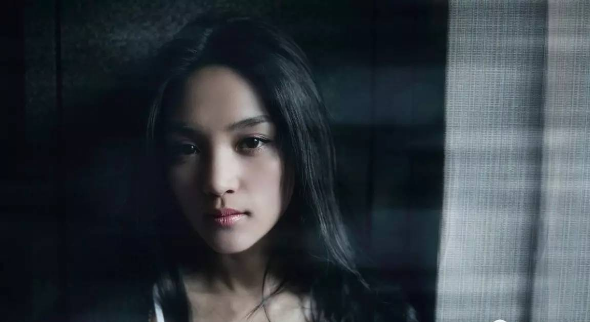
The exposure compensation of the camera is divided into positive (+) compensation and negative (-) compensation, which are represented by “+ / -” on the camera. In short, in backlight photography, using positive (+) compensation (or taking the darker part in the viewfinder as the metering standard) can properly show the details of the subject, virtualize the background and obtain high-profile photos. Using negative (-) compensation (or the photometric standard at the brighter part of the viewfinder) to obtain the silhouette effect, obtain low-key photos, and show the relationship between light and shadow. For example, the following figure:
Exposure Compensation Example I
It was the sun at 4 p.m. and the light was actually very strong, unlike the light in the photo. When shooting, I used the aperture first shooting method, negative two exposure compensation, and then measured the light in the brighter place of the cloud to get such a silhouette effect.
Exposure compensation is used in backlight photography. The stronger the light, the greater the contrast, and the better the effect. Of course, photographers should pay attention to the use of light shields. If the light is too strong, you should also use an object (sunshade) to block the sun in front of the lens. Don’t let the sun direct the lens, otherwise it is easy to leave the spot of the sun on the photo, destroy the beauty of the picture and affect the definition of the image.
Exposure Compensation Example II
Let’s look at Figure 2. Figure 3: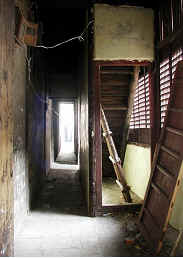
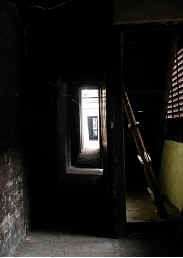
Basically from the same angle, figure 2 is a photo with more details obtained by measuring light in the dark in the positive (+) two gears. Overall, the picture is messy. On the contrary, in Figure 3, I used negative (-) exposure compensation to shoot, and got the effect of silhouette. Some unnecessary details are removed, which can better highlight the theme.
From the above picture, we can see the important role of exposure compensation in scene performance. Some experienced photographers often use the words “white plus black minus” to explain the essentials of exposure compensation. Due to the different reflectance of various scenes, there is no specific standard for the compensation range. Therefore, photographers should form the habit of carefully observing the scene and analyzing the balance and reflectance between black, white and gray. Grasp the exposure essentials you need from thinking and practice, and shoot wonderful works.
Finally, the photographer must be reminded that after photographing with the exposure compensation method, don’t forget to set the compensation value back to “zero”. Otherwise, the photos taken later are either overexposed or underexposed.
Exposure Compensation Plus and Minus Principle
Reasons for Exposure Compensation
Experienced photographers know that the camera has defects when measuring light because it measures reflected light. Its photometric characteristics determine that the “exposure compensation” function must be designed on the camera. The principle of camera photometric design is to determine the exposure by reducing the subject to a medium brightness with 18% reflectivity by integrating the brightness and contrast of the subject. In the “look” of the camera metering system, the average brightness of all subjects should finally be restored to 18% medium gray.
Exposure compensation is mainly needed for objects with special tone. For example, particularly bright objects, contents dominated by white or light tones or shadows with particularly deep colors, such as people with darker skin color, mine scenery or people wearing black clothes, etc.
Because the camera treats these objects with special brightness as medium gray tone during metering and exposure, it will automatically reduce the exposure when displaying white or light tone objects with high brightness, which is prone to underexposure.
In the performance of black or dark tone objects, the exposure will be automatically increased, which is prone to overexposure. Therefore, in photography practice, photographers need to use the exposure compensation function flexibly. Generally, exposure “positive compensation” is required when shooting light tone objects, that is, increase the exposure. Photographing dark tone objects requires exposure “negative compensation”, that is, reducing the amount of exposure. Through different compensation and artificial control of exposure, the real color of the subject will be restored more accurately.
Control Mode of Exposure Compensation
Exposure compensation is also an exposure control mode, which is generally about ± 2-3eV. It is divided into positive (+) compensation and negative (-) compensation, which are represented by “+ / -” on the camera.
In short, in backlight photography, using positive (+) compensation (or taking the darker part in the viewfinder as the metering standard) can properly show the details of the subject, virtualize the background and obtain high-profile photos. Use negative (-) compensation (or use the photometric standard at the brighter part of the viewfinder) to obtain the silhouette effect, obtain low-key photos, and show the relationship between light and shadow. If the ambient light source is dim, you can increase the exposure value (e.g. adjust to + 1eV, + 2eV) to highlight the clarity of the picture.
When taking high-key and low-key photos, the exposure value needs to be corrected. The so-called high-profile photos are photos with clear tone. Most of the picture is occupied by light white tone, and the image is only a light image composed of middle tone. If you want to get high-profile photos, you generally need to increase one level of exposure based on the measured exposure value. The so-called low-key photos mean that most of the picture is dark tone, with only a small number of intermediate tones and strong light parts. When taking low-key photos, it is generally one level less than the measured exposure value.
Difference Between Exposure Compensation and Fill Light
Exposure Compensation
Exposure compensation “and” light compensation “are two concepts. They aim at and solve different problems.
Exposure compensation is an adjustment made to the photometric characteristics of the camera. The purpose is to accurately restore the original tone characteristics of the subject. The objects that need exposure compensation are specific objects that are brighter or darker. Generally, the “+” of exposure compensation on the camera is to increase the exposure, and the “-” is to reduce the exposure. In the case of aperture priority, “+ 1” means to reduce the shutter speed by one gear. For example, from 1 / 60s to 1 / 30s, “+ 2” means L / 15s, “1” means 1 / 125S, and so on. In the case of shutter priority, “+ 1” means to increase the aperture by one gear. For example, from F11 to F8. “+ 2” means to increase the shutter speed by two gears, i.e. f5.6, “- 1” means to decrease the shutter speed by one gear, i.e. F16, and so on.
light compensation
The so-called “light compensation” is mainly aimed at the problem of too strong picture contrast in order to obtain more rich and high-quality photos. The exposure tolerance of digital cameras is similar to that of traditional color reversal films. Unlike negative films, they can record a wide range of light and dark brightness, which is not suitable for displaying the content when the contrast is too strong.
When the brightness difference of the subject is too large, it is difficult to give consideration to the levels of high light parts or low light parts. Generally, it is necessary to add light to the dark part with the help of flash lamp or reflective screen. Increase the brightness of the dark part through “fill light” to reduce the brightness difference and improve the photo level.
Because the brightness of the dark part is relatively improved after light filling, it can ensure the performance of the dark part level to a certain extent and improve the photo quality accordingly. Therefore, the functions of “light filling” and “exposure compensation” are completely different.
The principle of increasing exposure is:
- When the shooting environment is relatively dark and the brightness needs to be increased but the flash cannot be used, the exposure can be increased appropriately. Generally, 0.7-2.0 gear can be added.
- When the photographed white object looks gray or not white enough in the photo, the exposure shall be increased. Because the metering system of the camera is based on 18% gray. It thinks that white objects should also be gray, so it is often underexposed. Generally, about 1 gear shall be supplemented.
- When shooting people in front of the beach, snow, sunny or white background, it is necessary to increase the exposure appropriately. Because the camera metering system will detect enough bright light. Reducing the exposure will make the subject underexposed. If it is completely backlight, you can fill 1.0-2.0. If the character subject is not completely backlight, you can fill 0.5-1.0.
- When shooting in front of sunny windows and backlit scenes, the exposure should also be increased, about 0.7-1.5.
- In cloudy days or heavy fog, although the environment is bright, the illumination of the main body is obviously insufficient, which is easy to make the whole photo dim. Properly increasing the exposure can make the brightness of the scene more natural. Generally, add 0.3-1.0 gear.
- When taking high-profile photos, appropriately increase the exposure to better reflect the photographer’s creative intention. Generally, increase 0.5-1.5 gear.
The principles for reducing exposure are:
- When shooting a person in front of a black or dark background, it is necessary to appropriately reduce the exposure to avoid overexposure of the subject. Generally reduce gear 0.5-1.5.
- When shooting a black or dark subject and the subject is basically full of the picture, the exposure shall be appropriately reduced. Generally, reduce 0.5-1.5 gear.
- When shooting the night scene, the exposure obtained by the metering system of the camera will make the picture too bright and lose the effect of the night scene, so the exposure should be reduced appropriately. Generally, the gear is reduced by 0.3-1.0.
- When taking low-key photos or deliberately pursuing dim effects, you should reduce the exposure to complete your creativity, generally by 0.5-1.0.
Precautions for exposure compensation
When using exposure compensation, three points should be noted:
- After using the exposure compensation setting, be sure to return in time to prevent exposure errors in future shooting.
- When the exposure compensation is uncertain, it is best to use the surrounding exposure function and take more pictures.
- Increase the exposure when the light is dim. It is best to use a tripod.
It should be noted that after shooting the subject with specific brightness, the “exposure compensation” should be reset to “0” in time to ensure normal exposure for future shooting.
During the shooting process of the digital camera, if half of the shutter is pressed, the LCD screen will display pictures similar to the final effect picture, focusing and exposure, and everything starts. The exposure at this time is the exposure of the final picture. If the picture is obviously bright or dark, it indicates that there is a large deviation in the automatic metering accuracy of the camera, and exposure compensation shall be enforced. However, sometimes, the brightness displayed during shooting is different from the actual shooting results. The digital camera can browse the picture immediately after shooting. At this time, you can more accurately see the brightness of the captured picture, and there will be no difference. If the shooting result is obviously too bright or too dark, re shoot and force exposure compensation.