Table of Contents
Introduction to Monochrome Background
Monochrome background is a shooting technique often used in indoor studio shooting. Photography is constantly updated with the changes of the times. With the explosive growth of location scenes and the rapid development of various real scenes, the proportion of monochrome background studio shooting in photography has declined. But in the past two years, the monochromatic background has been valued again by us. The reason is that the monochromatic background can highlight the characters to the maximum.
Indoor monochromatic background lighting is varied, and it can be “knowledgeable” depending on the subject of the shot. Here I will share with you several lighting methods for monochromatic backgrounds. Discuss how to use the design of light to make the picture more suitable for the theme and express the photographer’s creative intentions.
In a monochrome background, the use of a single lamp is more common, and it can be said to be diverse and eclectic. Of course, the single-lamp technique used by different themes, such as soft light, hard light, flash light, continuous light, etc., and the lamps used-soft box, radome, honeycomb, etc. are different. Here we will gradually decompose the usage of lights from simple to complex.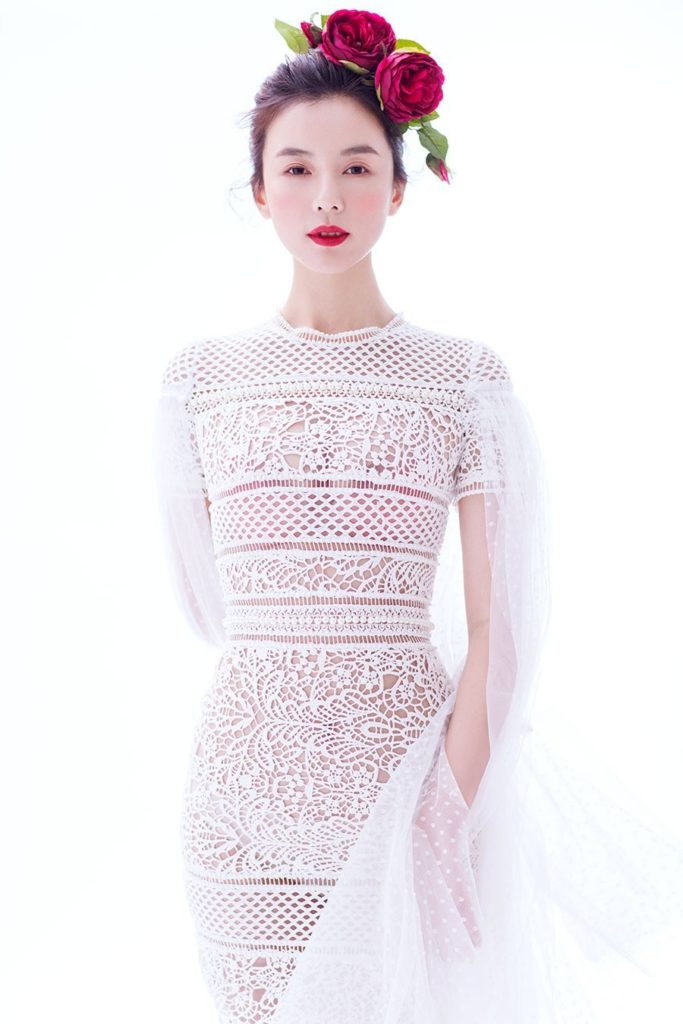
Two Simple and Practical Single-light Lighting Methods
One is hard-light single-lamp shooting, and the other is soft-light single-lamp shooting. The luminaire uses two kinds of radome and soft box. Obviously, the use of different light qualities can express two different character emotions, fashion and feminine.
When shooting with a radome, keep people as close to the background as possible. This can reduce the shadow area on the background when the light illuminates the person.
The lights should be as far away from the characters as possible. The recommended distance is about 6 meters. The purpose is to make the background light in a large area. In this way, the lighting screen is cleaner, and the shape of the character’s face is more three-dimensional.
The height of the radome should be as high as possible, and the light position should be in a straight line with the lens and behind the camera. In this way, the projection area of the characters can be reduced, which is more conducive to shooting.
The advantage of shooting with this kind of light is that the characters and the background are in a light field, the light is cleaner, and the characters have better texture performance. The disadvantage is that the projection caused by the light on the face of the character is slightly harder.
The single-lamp shooting method of the softbox is actually the same as the use of the radome, the difference is that the different light quality causes the change of the projection. The projection under the soft box is softer and the transition is more natural.
Shooting with a radome
Aperture: f/4.5, speed: 1/125s, ISO: 200, focal length: 85mm
Use softbox to shoot
Aperture: f/5.6, speed: 1/160s, ISO: 200, focal length: 70mm
Single lamp lighting method with reduced light ratio
On the basis of a single light, we can make some adjustments to make the background and the light of the characters cleaner and softer. In short, it is to reduce the light ratio. Generally, you only need to add two more lights next to the background.
The two lights next to the background are crucial to the light ratio control of the entire picture. The light value is strong, the background color is light, the light value is weak, the background color is dark, and the projection is strong.
Key points of lighting:
It is recommended to use a soft box for the two lights next to the background, so that the light quality is softer. The direction of the light is to hit the walls on both sides of the background, so that the light will be reflected back and irradiate the entire background and the characters evenly.
The light ratio of the background and the characters is controlled at 1:1 or 1:2. In this way, the light of the whole picture will be more clean and soft. The transition of light projections on the characters and faces is smooth.
Aperture: f/4.0, speed: 1/160s, ISO: 200, focal length: 85mm
Single lamp lighting method with white background
The white background is also what we often use when shooting the subject. There are many lighting methods, here is a form I prefer: two background lights and a foam reflector. This kind of lighting is transparent and soft, making it easy to shoot. After arranging the light field, the light does not need to change with the turning of the character’s face.
1. Arrange the main light
When conditions permit, the characters should be about 3 meters away from the background. Place a light on a corner parallel to the background as the main light. Raise the position of this light to the highest possible position. The lamp head illuminates the area behind the person and the background 45 degrees downward.
Try not to sweep the main light on the character. Because the main light is a hard light, if it shines on a character, it will increase the light ratio between the highlight and dark areas of the character. It is difficult to control the details of highlights and dark parts, and it is also difficult to fill in the dark parts to achieve the same or close to the light ratio of the highlight area (here is the case of using a foam reflector to fill light).
2. Arrange auxiliary lights
After the main light is arranged, we can arrange the auxiliary lights. The auxiliary lamp is placed in the other corner parallel to the background, the difference is that the lamp head faces the ceiling.
The height of the auxiliary lamp should not be too high, and there should be a certain distance from the ceiling. In this way, the area of light reflected by the auxiliary lamp hitting the ceiling will be larger. The main and auxiliary light lines are coordinated to basically control the light ratio of the entire screen.
The main light exposes the background and creates the contour light of the character, and the auxiliary light compensates for the area light in the dark part of the character.
3. Reflector fill light
At this time, we also need a large foam reflector to place on the floor in front of the character to fill the front of the character. The light effect of the whole picture is a diffuse dream effect.
Aperture: f/2.2, speed: 1/160s, ISO: 200, focal length: 85mm
Several reflected light application monochrome background
In monochrome background shooting, most photographers like to shoot the flash directly on the person. But I prefer the soft and beautiful diffused light, which is more mysterious. Suitable for expressing calm and introverted character emotions.
Let me share with you several applications of reflected light on a monochromatic background. The light shines on the characters through diffuse reflection, with a soft texture and the effect of natural light.
1. Front side diffused light
Place two large foam reflectors at a 45-degree angle in front of the character, and there must be a certain distance from the character, at least 3 meters. Because the farther you are from the character, the larger the area of light reflected back.
Place a flash with a soft box in front of the reflector. Pay attention to the distance between the lamp and the reflector here. If the lamp is too close to the reflector, the reflected light will easily become a point source. The farther the flashlight is from the reflector, the wider the area of light reflect back, and the more diffuse the light quality.
At the same time, the up and down angle of the main lamp and the height of the lamp directly affect the light reflected on the face of the character. If the lamp holder is too low, the reflected light will become “ghost light”. If photographer raise the light head too high, the intensity of the reflected light will reduce sharply. So try more and adjust the height of the light according to the character’s posture (standing or sitting).
On the other side of the character, photographer should also place a foam reflector to fill in the light. The purpose is to reduce the contrast of light. At the same time, photographer should also reduce the intensity of the main light as much as possible, so that you can use a larger aperture value to shoot.
Aperture: f/2.2, speed: 1/160s, ISO: 200, focal length: 85mm
2. High level diffused light
Diffuse light is also directional, and can also be used for light ratio. The key is how we control the intensity of the light and the direction of the light. The lighting method introduced next is actually the same as the above one, but the difference is the incident angle of the light, that is, the photographer uses the light source shining from above the person’s side.
In the same way, if we want to get a larger projection area, we must pay attention to the distance between the light and the reflection source. The distance is far, the area reflected back is larger. If I need a larger area of diffused light, I can use two softboxes and place them on the side of the character. The distance between the two soft boxes should also be opened to further expand the irradiation area.
The two lamps are facing the ceiling at the same time, so that the light diffuses down from the upper side of the characters, creating a light effect with both a soft light ratio and a strong directionality.
Place a foam reflector on the other side of the character to fill in the dark parts. Because the light is diffused from the top of the character’s head, the details of each area of the character are very ideal.
Aperture: f/2.8, speed: 1/160s, ISO: 200, focal length: 125mm
What I have introduced to you above is the lighting application of several kinds of monochrome background shooting. When shooting, pay attention to the light ratio of the background to the person, and handle the direction of the light. With a full understanding of the principle of light reflection, you can do well in shooting a monochrome background, and draw inferences about it.